


-16-
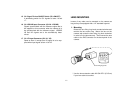
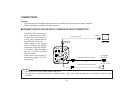
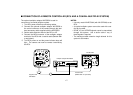
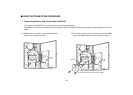
Connection to the RCU (WV-RC700A) is made through the
optional conversion cable WV-CA26T20 and a studio
cable.
1. Turn RCU power off before connecting cables.
2. Set the cable selection switch of the RCU to MULTI.
3. Connect the 20 pin connector of the conversion cable
to the REMOTE Connector of the camera. The conver-
sion cable and the studio cable must be connected
with the connector supplied as a standard accessory
with the conversion cable.
4. Turn RCU power on and the power indicator lamp will
light. The camera can now be remote controlled by
the RCU.
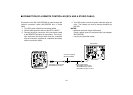
NOTES:
• Maximum extension length: 300 meters
(Studio cables must be connected with joint adaptor
WV-CA26T26.)
• Use only the specified cables.
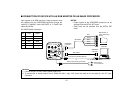
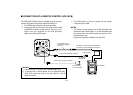
■ CONNECTION OF A REMOTE CONTROLLER (RCU AND A STUDIO CABLE)
GEN-LOCK
IN
AUX
IN
AUTO
75¶/Hi-Z
AUTO
75¶/Hi-Z
R/PR /C
OUT OUT
AUDIO
SEE MANUAL
VIDEO 1
G/Y/Y VIDEO 2
B/PB /B SYNC
S-VIDEO
1 4
2 3
TALLY
CAMERA (MULTI)
CABLE SELECT
FUSE
125V 2A
TALK
INCOM
RECEIVE
CONTROL
TALLY & INCOM
MULTI OVP
MPX
MPX
OUTPUT
ZOOM/FOCUS
REMOTE
EXT DC IN
PAGE
ITEM
(AWC)
UP
(ABC)
DOWN
(BAR)
IRIS
SEE MANUAL
CAUTION
CONNECT TO SPECIFIEDCONNECT TO SPECIFIED
CLASS 2 POWER SUPPLYCLASS 2 POWER SUPPLY
ONLY SEE MANUALONLY SEE MANUAL
VBS/HD
75 
VD
VIDEO/RGB
CONTROL
VIDEO OUTG/L IN
ON
OFF
Connector supplied
with WV-CA26T20
Studio cable (Option)
WV-CA26U15 (50 ft/15 m)
WV-CA26U30 (100 ft/30 m)
WV-CA26U100 (330 ft/100 m)
Set to MULTI
WV-RC700A
Conversion cable (Option)
WV-CA26T20 (10 ft/3 m)