


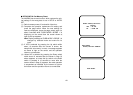
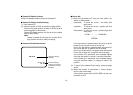

■ Camera ID Setting
(1) Display the page No.5 of the INITIAL SET menu.
(2) Move the cursor to CAMERA ID, and press the page
switch for more than 2 seconds to display the camera
ID setting mode.
■ How to Set
(1) Move the cursor (blinking) using the item switch, Up
switch, or Down switch, and select characters or a
command to set.
-50-
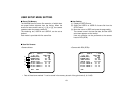
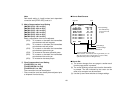
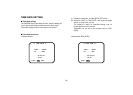
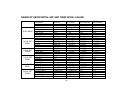
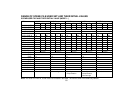
** CAMERA ID **
ABCDEFGHIJKLM
NOPQRSTUVWXYZ
0123456789
().,'":;&#!?=
+-*/%$
←→
←→
SPACE
POSI RET END RESET
AW-E560.........
■ How to Read Screens
Cursor
Characters that
can be set
Command
Set characters
(". " indicates a space.)
Cursor (blinking)
indicates next character
position.
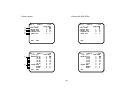
(2) To enter a character for camera ID, press the page
switch when the cursor is on the desired character.
The character is set, and is shown on the bottom line
of the screen.
(3) If the page switch is pressed when the cursor is at ←,
the cursor moves from the set character to one posi-
tion left.
(4) If the page switch is pressed when the cursor is at →,
the cursor moves from the set character to one posi-
tion right.
(5) If the page switch is pressed when the cursor is at
SPACE, a blank is left.
(6) If the page switch is pressed when the cursor is at
POSI, camera ID display position is ready to be set.
(7) If the page switch is pressed when the cursor is at
RESET, all the set characters are erased.
(8) To return to the INITIAL SET menu state, move the cur-
sor to RET and press the page switch.
(9) To return to the normal state, do the following steps.
If the camera is used alone, move the cursor to END,
and press the page switch.
If the camera is used with an RCU (RCB), set the user
set switch to OFF.
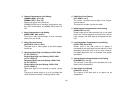
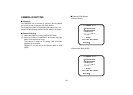
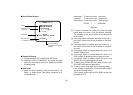
UP SW ←→ DOWN SW
↓
ITEM SW
Item switch: To move the cursor 1 line down
Up switch: To move the cursor 1 position left
Down switch: To move the cursor 1 position right