


-41-
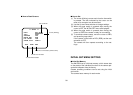
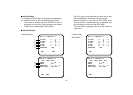
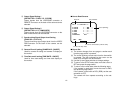
@5 Output Signal Setting 1
[OUTPUT SEL1: R/G/B, Y/C, Y/PR/PB]
Output signals from the VIDEO/RGB connector or
REMOTE connector on the back of the camera can be
selected.
@6 Output Signal Setting 2
[OUTPUT SEL2: Y/C, COMPOSITE]
Output signals from the VIDEO/RGB connector on the
back of the camera can be selected.
@7 Synchronizing Signal Output Level Setting
[SYNC SEL: 0.3 V/4.0 V]
The synchronizing signal output level from the VIDEO/
RGB connector on the back of the camera can be
selected.
@8 Camera ID on/off setting [CAMERA ID : ON/OFF]
Used for camera ID setting and camera ID display on
the monitor.
@9 Time Date on/off setting [TIME DATE : ON/OFF]
Used for time date setting and time date display on
the monitor.
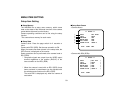
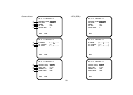
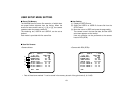
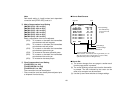
■ How to Read Screens
NO.1 ** INITIAL **
R GAIN +....I....-
B GAIN +....I....-
T PED +....I....-
R PED +....I....-
B PED +....I....-
PAINTING OFF
RET END
Cursor (blinking)
Set parameter
Page No.
To return to setup state
To return to normal state (camera alone)
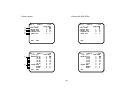
■ How to Set
(1) The screen changes from one page to another each
time the page switch is pressed.
(2) The cursor (blinking) moves each time the item switch
is pressed. The item indicated by the cursor can be
reset or its command can be executed.
(3) Use the Up and Down switches to change settings.
(4) To return to the SETUP menu state, move the cursor to
RET and press the page switch.
(5) To return to the normal state, take the following steps.
If the camera is used alone, move the cursor to END,
and press the page switch.
If the camera is used with an RCU (RCB), set the user
set switch to OFF.
The camera will then operate according to the set-
tings.