


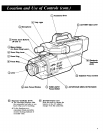
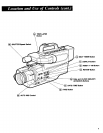

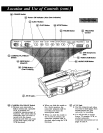

(1@SELF TIMER Button
• This button lets you time-
delay the start of a recording
by about 10 seconds so you
can join the picture without
being seen walking into it.
• Details are on page 29.
(1(1@DISPL.4 Y Button
• Pressing this button brings the
status indicators and displays
to the screen in the viewfinder.
• Press D1SPLAY once to bring
the Battery Level and Tape
Counter displays to the
viewfinder.
• Press DISPLAY again to add
the memory feature to the
Tape Counter.
• Press DISPLAY again to change
the Tape-Counter display to
the Time-Remaining Display.
• Press D1SPLAY again to remove
the displays.
• Details on using each display
are on pages 26 and 27.
RESET/T-160 Button
• When the tape counter is
displayed in the viewfinder,
pressing this button resets the
counter to "0000".
• When the time-remaining
read-out is displayed, pressing
this button changes the display
for extended length T-160
tapes.
• The indicator next to the
T-160 button will fight.
• Details are on page 27.
I(I_ REVIEW Button
• Press this button while the
camcorder is in the Record/
Pause mode to view the last
few seconds of a completed
recording segment.
(_) Date and CLOCK Set Buttons
(SELECT and ADVANCE)
• These buttons are used to set
the clock (time and date) in
your camcorder so it can be
recorded on your tapes for
future reference.
• Details are on page 22.
@ DATE/
TIME Button
• Press this button to display
the date and clock in the
viewfinder.
• Whenever the date and time
appear in the viewfinder, they
will be recorded on the tape.
• Details are on page 22.
@ FADE Button
• During recording you can add
a professional touch to your
recordings by fading in and
out of scenes.
• Details for using this button
are on page 25.
• When you use the FADE
button to fade in and out, the
sound will also fade in and
out with the picture.
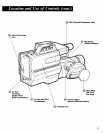
@.4
UTO IRIS Control
With this control in the center
"click" position, the
camcorder automatically
adjusts the lens opening for
the best picture.
The lens iris opening can also
be manually adjusted to
compensate for these unusual
hghting situations:
1. When the subject is in
bright light and the
background is dark, turn
this control counterclockwise
to close the lens iris
opening.
2. When the background is in
bright light and the subject
appears too dark, adjust the
control clockwise to open
the lens iris.
• Details are on page 25.
(_ SHUTTER Speed
Switch
• The shutter speed is
automatically set at the
normal shutter speed of 1/60
whenever the camcorder's
power is turned on.
• Slide the SHUTTER speed
switch to the right once to
select a shutter speed of
1/500.
• Slide the SHUTTER speed
switch to the right a second
time to select a shutter speed
of 1/ 1000.
Slide the SHUTTER speed
switch to the fight a third time
to return to the normal shutter
speed of 1/60.
Higher shutter speeds are
displayed in the electronic
viewfinder. No shutter speed
indicator appears when the
normal (1/60) speed is
selected.
• If you need more light, the
shutter speed indicator in the
viewfinder will flash.
• Details are on page 28.
Note: The higher the shutter
speed, the less blurred fast-
moving recorded action will
appear during slow-motion
and stop-action. Also, more
light is required for higher
shutter speeds.
2_ TIME LAPSE
Button
• This button allows time lapse
and animation recording.
• Details are on pages 29 and
30.