


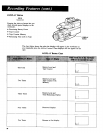
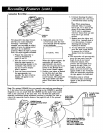

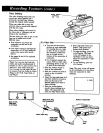

Animation Recording
The adjustable time-lapse feature
also lets you create animation
recording-"car tooning". For
example, you can make an object
appear to move by taking several
still shots of it in different
positions. When the tape is played
back, the object appears animated.
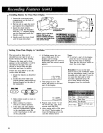
1. Prepare the camcorder to
record as described on
pages 18 and 19.
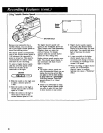
2. Press the DISPLAy button to
bring the tape-counter (or
time-remaining) display to the
viewfinder. Th_ will let you
see the INTERVAL display
when it appears.
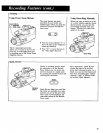
3. Press the TIME LAPSE button
for approximately two
seconds. The first INTERVAL
display will appear in the
viewfinder.
LAPSE
Button
DISPLA Y
Button
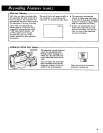
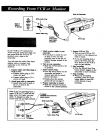
4. Repeatedly press the TIME
LAPSE button until the word
MAN (manual interval) appears
in the viewfinder.
INTERVAL MAN.
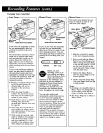
5.
When this display appears, the
camcorder will record for
approximately one second
each time you press the PAUSE
button or the Record Start/
Stop button (thumb trigger).
Position your object as desired
for the first shot, and then
press the thumb trigger (or
PAUSE button). The camcorder
will record briefly and then
pause. Don't move the object
yet.
6. Continue shooting the object
in this position for a few more
l-second shots before moving
it.
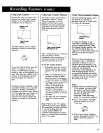
Note: When preparing an
animated video, it's usually
best to get 3 to 5 shots of the
object in the same position.
You'll want to experiment
with how many shots you take
each time to get smooth
motion.
7. Slightly move the object and
shoot a few 1-second shots of
it in this position. Continue
shooting and moving the
object(s) as desired.
8. To stop animation recording,
press the TIME LAPSE button
to remove the INTERVAL
display from the viewfinder.
Notes:
• The camcorder will automatically
move the tape away from the
heads if you do not record
within five minutes. This
prevents the tape heads from
wearing the tape. When you
begin to record after a long
pause, the word STANDBY will
appear briefly in the viewfinder
while the camcorder repositions
the tape against the headwheel.
• Rainbow noise (a vertical
colored bar) may occasionally
appear in the picture during
playback.
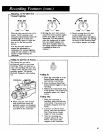
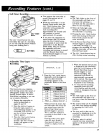
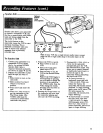
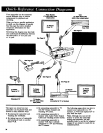
Note: The optional CRM020 lets you remotely start and stop recording up
to 15 feet away from the camcorder. The plug on the CRM020 is specially
designed so you can attach both the CRM020 and the audio/video output
cable to the camcorder at the same time. You will find this application
especially convenient during animation recording or anytime you want to
control the camcorder from a distance. See pages 44 and 45 for optional
accessories.
CRM020 Remote
Record Start/Stop Switch
(optlorml)
Audio/Video
Output Cable
(supplied)
To Audio/Video
Inputs on
TV Monitor
!I 1
Fl_t _nn_-'t the CRMO20'a
plug to camcorder's AV OUT
Jack. Then plug the
audio/video output cable
Into back of CRM020 plug.
30