


13
Location and Function of Parts
Chapter 1 Overview
Location and Function of Parts
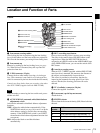
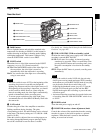
Front
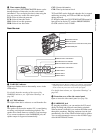
a Lens mount securing rubber
After locking the lens in position using the lens locking
lever, fit this rubber over the lower of the two projections.
This fixes the lens mount, preventing it from coming loose.
b Lens mount cap
Remove by pushing up the lens locking lever (see page
14). When no lens is mounted, keep this cap fitted for
protection from dust.
c LENS connector (12-pin)
Connect the lens cable mainly for using a
2
/3-inch type
lens. (This connector is not used for a
1
/2-inch type lens,
which is connected by the hot shoe inside the lens mount.)
Consult your Sony dealer when you are using a lens other
than VCL-719BXS (supplied with the PDW-F330K).
When mounting or removing the lens on this unit, power
off this unit first.
d AUTO W/B BAL (automatic white/black balance
adjustment) switch
Activates the automatic white/black balance adjustment
functions.
WHT: Adjusts the white balance automatically. If the
WHITE BAL switch (see page 16) is set to A or B, the
white balance setting is stored in the corresponding
memory. If the WHITE BAL switch is set to PRST,
the automatic white balance adjustment function does
not operate.
BLK: Adjusts the black set and black balance
automatically.
e REC (recording start) button
Press to start recording. Press it again to stop recording.
The effect is the same as that of the REC button on the
supplied lens. When the REC SWITCH function is
assigned to an ASSIGN switch on the ASSIGNABLE page
of the OPERATION menu, you can use the switch as the
REC button.
f Auto focus ranging sensor
When an VCL-719BXS (supplied with the PDW-F330K)
auto focus lens is mounted, this measures the distance to
the subject, and automatically focuses the lens.
This sensor is provided as an auxiliary function for
improving the automatic focusing speed. Even if this
sensor is blocked, the focusing precision will not be
affected.
g VF (viewfinder) connector (20-pin)
Connect the supplied viewfinder.
h Lens mount (special bayonet mount)
Attach the lens.
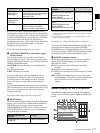
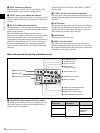
i FILTER selector
Selects from the four neutral density (ND) filters built into
this unit.
5 REC button
2 Lens mount cap
4 AUTO W/B BAL switch
8 Lens mount
9 FILTER selector
3 LENS connector
7 VF connector
0 ZEBRA button
qa ASSIGN 1/2 switches
qs Lens locking lever
qd MENU knob
qf SHUTTER switch
qh AUDIO LEVEL knob
1 Lens mount securing rubber
6 Auto focus ranging
sensor
qg Remote commander receptor
Note
Position
number
ND filter
1 CLEAR
2
1
/4 ND (attenuates light to approximately
1
/4)
3
1
/16 ND (attenuates light to approximately
1
/16)
4
1/
64 ND (attenuates light to approximately
1
/64)