


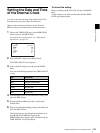

43
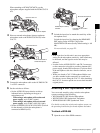
Adjusting the Viewfinder
Chapter 2 Preparations
Adjusting the Eyepiece Focus and
the Screen (Brightness, Contrast,
and Outline Emphasis)
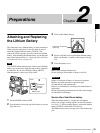
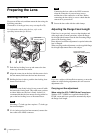
a) For the DXF-20W, the eyepiece focusing ring.
To adjust the eyepiece focus
First focus the image with the lens, then adjust the
eyepiece focusing knob or eyepiece focusing ring to get
the clearest viewfinder image for your eyesight.
The visual adjustment range is
–3D to 0D (DXF-801) or
–3.5D to +0.4D (DXF-20W).
You can change the adjustment range by installing an
exchange part. The adjustment range after the exchange is
as follows.
• DXF-801:
–2D to +1D, or –0.5D to +3D
• DXF-20W:
–3.6D to –0.8D, or –2.8D to +2.0D
Contact a Sony service representative for more
information about exchange parts.
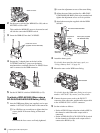
To adjust contrast and brightness
Carry out these adjustments with the color bars displayed.
1
Set the OUTPUT/DCC switch to the BARS position.
The color bars appear on the viewfinder screen.
2
Watching the color bars, turn the CONTRAST and
BRIGHT controls to adjust the contrast and
brightness.
3
Return the OUTPUT/DCC switch to its original
position.
To adjust the outline emphasis
Turning the PEAKING control changes the degree of
outline emphasis in the viewfinder image, to make
focusing easier.
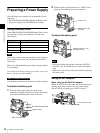
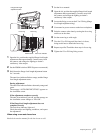
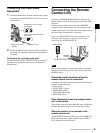
Attaching a 5-inch Electronic
Viewfinder
You can attach an optional DXF-51 (5-inch) Electronic
Viewfinder. To attach it, an Accessory Shoe Kit (service
part number: A-8274-968-B) is required.
For details, contact your Sony dealer.
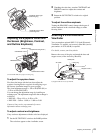
Remove the cover of the grip, and attach the shoe and
stopper screw (of the Accessory Shoe Kit).
a) Supplied with the Accessory Shoe Kit
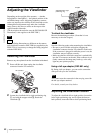
Viewfinder left-to-right
positioning ring
Viewfinder front-to-back
positioning knob
Eyepiece focusing knob
a)
BRIGHT control
CONTRAST control
OUTPUT/DCC switch
PEAKING control
VF Cable
Guide plate
Fixing ring
Shoe
a)
Stopper screw
a)