


57
Basic Procedure for Shooting
Chapter 3 Recording and Playback
Basic Procedure for
Shooting
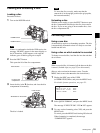
1
Set the POWER switch to ON.
2
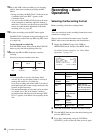
Set the FILTER selector and the 5600K button
appropriately for the lighting conditions.
a) The range over which the subject is sharply in focus. Thus, “reducing
the depth of field” means that the range is reduced as well, and
“increasing the depth of field” means that it is increasing as well.
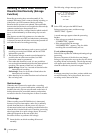
3
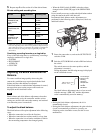
Check the switch settings on the camcorder.
If you do not have enough time to check the settings of
the unit, you can turn the EZ MODE-assigned switch
on to use EZ mode for instant shooting.
EZ mode
In EZ mode, the settings of this unit are fixed at
standard values, and the lens aperture and white
balance are adjusted automatically. In this state, it is
not possible to change menu or other settings. To
change settings, turn EZ mode off. In the factory
default configuration, the ASSIGN 1 switch (see page
142) turns EZ mode on and off.
4
Check the settings in the menu.
5
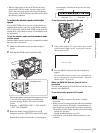
Check the lens settings and flange focal length
adjustment (see page 40).
6
Adjust the viewfinder eyepiece focus, and the contrast
and brightness of the viewfinder image (see page 42).
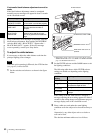
7
Check the audio system settings.
• Microphone connections (see page 46)
• Settings on the VDR section (see page 20)
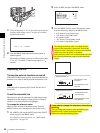
8
If necessary, display the center marker and/or safety
zone marker on the viewfinder screen.
For details, see “Setting the Marker Display” on
page 137.
Also, press the ZEBRA button to display a zebra
pattern on the viewfinder screen.
9
If necessary, adjust the white balance and black
balance (see page 59).
10
If necessary, adjust the iris and gain.
For details about the adjustment of iris, see “Iris ring”
on page 27, and “Adjusting the Iris” on page 64.
For details about the adjustment of gain, see “GAIN
switch” on page 15, and “Setting Gain Values for the
GAIN Switch Positions” on page 140.
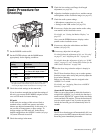
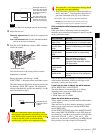
11
Turn the focus ring so that the subject is sharply in
focus.
The EZ focus function allows you to set the aperture
function to open, and to easily and precisely adjust the
focus before shooting.
Before use, this function must be assigned to the
ASSIGN 1 or 2 switch.
For details, see “Assigning Functions to ASSIGN
Switches” (page 142).
About the EZ focus function
When you press the switch to which this function is
assigned (the ASSIGN 1 or 2 switch), the function is
turned on and “EZ FOCUS” appears in the viewfinder
screen and the LCD monitor. To turn the function off,
press the switch again. Even if you do not press the
switch, the function goes off automatically after 10
seconds.
The EZ focus function goes off automatically if it is on
when you press the REC button on this unit or the lens.
Recording starts immediately thereafter.
FILTER selector
setting
Examples of shooting
conditions
1 (CLEAR) Indoor shooting
2 (
1
/
4
ND)
Cloudy or rainy outdoor shooting,
or to reduce the depth of field
a)
3 (
1
/
16
ND)
Sunlight
4 (
1
/
64
ND)
To reduce the depth of field in
sunlight
1 8 2
11
12,13
Note