


164
Maintenance
Appendix
turn the control counterclockwise as seen from the
camcorder front.
(4) Testing the earphone and speaker
1
Turn the MONITOR knob and check that the speaker
volume changes accordingly.
2
Connect an earphone to the front or rear EARPHONE
jack.
Check that the speaker sound is cut off and that you
can hear the sound from the microphone in the
earphone.
3
Turn the MONITOR knob and check that the earphone
volume changes accordingly.
(5) Testing external microphones
1
Connect external microphones to the AUDIO IN CH-
1 and CH-2 connectors.
2
Set the +48V/OFF switches as follows.
• If the connected microphone is of the internal power
supply type, set the switch to OFF.
• If the connected microphone is of the external power
supply type, set the switch to +48V.
3
Set the AUDIO IN switches to REAR.
4
Aim the microphones at a sound source.
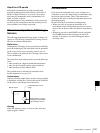
5
Check that the audio level meters in the LCD monitor,
and the audio level indications in the viewfinder
change with the volume of the sound.
(6) Checking the user bit and timecode functions
1
Set the user bits as required.
For the operation, see “To set the user bits” on
page 67.
2
Set the timecode.
For the operation, see “To set the timecode” on
page 66.
3
Set the F-RUN/SET/R-RUN switch to R-RUN.
4
Press the REC button, and check that recording starts
and that the timecode indication in the time counter
display section changes.
5
Press the REC button again, and check that recording
stops and that the timecode indication stops changing.
6
Set the F-RUN/SET/R-RUN switch to F-RUN, and
check that the timecode indication starts changing
again and continues to change even when you restart
recording and stop recording again.
7
Set the COUNTER/CHAPTER button to U-BIT, and
check that the user bits data that was set is displayed.
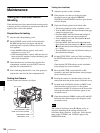
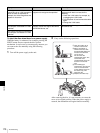
Maintenance
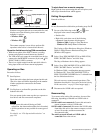
Cleaning the viewfinder
Use a dust blower to clean the CRT screen and mirror
inside the viewfinder barrel.
Clean the lens and protecting filter with a commercially
available lens cleaner.