


Thumbnail Operations
106
Chapter 5 Clip Operations
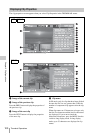
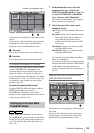
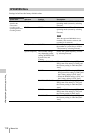
a Timecode
This is the timecode of the selected frame in the
shot mark thumbnail screen.
In the essence mark thumbnail screen (see
page 105) or the expand thumbnail screen (see
page 104), you can add thumbnails to any frame
of clips recorded in HD mode, and delete
recorded shot marks.
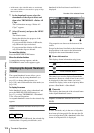
To add shot marks
1 Select the frame where you want to add
a shot mark, and then select
THUMBNAIL > Set Shot Mark > Add
Shot Mark1 (or Add Shot Mark2).
The properties screen of the selected frame
appears, and a confirmation message appears
below the image.
2 Select [Execute], and press the MENU
knob.
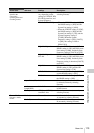
To delete shot marks
1 Select the frame where you want to
delete a shot mark, and then select
THUMBNAIL > Set Shot Mark >
Delete Shot Mark1 (or Delete Shot
Mark2).
The properties screen of the selected frame
appears, and a confirmation message appears
below the image.
2 Select [Execute], and press the MENU
knob.
In the essence mark thumbnail screen (see
page 105) or the expand thumbnail screen (see
page 104), you can set the selected frame of the
clip recorded in UDF/FAT-HD mode as the index
picture.
1 Select the thumbnail of the frame that
you want to use as the index picture,
and then select THUMBNAIL >Set
Index Picture.
The properties screen of the selected frame
appears, and a confirmation message appears
below the image.
2 Select [Execute], and press the MENU
knob.
Note
Even if you set the index picture to a frame that is not the
first frame of a clip, playback of that clip from a
thumbnail screen always begins at the first frame.
In the expand thumbnail screen (see page 104)
and the essence mark thumbnail screen (see
page 105), clips recorded in FAT-HD mode can
be divided into two clips at the selected frame.
1 Select the thumbnail of the frame where
you want to divide the clip, and then
select THUMBNAIL >Divide Clip.
The properties screen of the selected frame
appears, and a confirmation message appears
below the image.
2 Select [Execute], and press the MENU
knob.
The clip is divided at the selected frame, and
two clips with different names are created.
The first four characters of the clip name are
taken from the name of the original clips, and the
last four characters are new serial numbers.
Example: When the name of a newly recorded
clip would be EFGH0100, and a clip named
ABCD0002 is divided, the names of the two
newly created clips are ABCD0100 and
ABCD0101.
Note
When there is not enough remaining capacity on the SxS
memory cards to store the divided clips, a message
appears to inform you that there is not enough capacity.
Adding and Deleting Shot Marks
UDF / FAT-HD
Changing Clip Index Pictures
UDF / FAT-HD
Dividing Clips
FAT-HD