


Saving and Loading User Files
165
Chapter 7 Saving and Loading User Setting Data
4 Select the desired file number, and then
press the MENU knob.
A confirmation message appears.
5 To execute the load, select [Execute],
and then press the MENU knob.
To cancel the load, select [Cancel], and
then press the MENU knob.
If you selected Lens Recall SxS >Execute in
step 2, the ACCESS lamp lights (in blue on
the right-side panel and in orange in the card
slot section) when you execute the load.
When the specified lens file has been loaded,
a completion message appears and the
ACCESS lamp goes out.
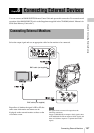
When using a USB flash drive (in UDF mode)
Connect a formatted USB flash drive (see
page 73) to the external device connector.
Select Lens Recall USB >Execute in step 2.
When you are using a lens that support serial
communication, you can set up the camcorder by
automatically loading the lens file that
corresponds to the lens settings (Lens Auto Recall
function).
To use the Lens Auto Recall function, set FILE
>Lens >Lens Auto Recall in the setup menu to
one of the following.
On: Load the lens file that corresponds to the
model name.
Off: Do not use the Lens Auto Recall function.
Serial Number: Load the lens file that
corresponds to the model name and serial
number (when the lens supports
communication of the serial number).
If the lens does not support communication of the
serial number, both settings load the lens file that
corresponds to the model name.
You can save the customized USER menu
configuration and settings along with white
balance data as user files.
To save a user file to an SxS memory card, insert
the card into a memory card slot and then proceed
as follows.
See “Basic Setup Menu Operations” (page 109) for
information about menu operations.
1 Select FILE >User in the setup menu.
To assign a name to the data before saving
it
Assign a name before proceeding to step 2.
For details, see “To assign names to files”
(page 161).
2 Select User Save SxS >Execute.
A user file list box appears.
File numbers where “No File” is displayed
are empty file numbers. File numbers with a
file name or a date and time are the number
of files that already contain data.
3 Turn the MENU knob to select the
desired file number.
4 Press the MENU knob.
A confirmation message appears.
5 To execute the save, select [Execute],
and then press the MENU knob. To
cancel the save, select [Cancel], and
then press the MENU knob.
If you choose to execute the save, the
ACCESS lamp lights (in blue on the right-
side panel and in orange in the card slot
section). A completion message appears and
the ACCESS lamp goes out when the data
has been saved.
Loading Lens Files Automatically
Saving and Loading
User Files
Saving User Files