


Setting the Date/Time of the Internal Clock
41
Chapter 2 Preparations
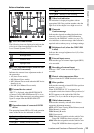
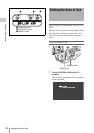
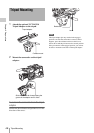
2 Press the MENU knob.
The settings for selectable areas of use are
displayed.
3 Turn the MENU knob to select the
desired area of use.
a) The composite signal output from this camcorder
is an NTSC signal with a black setup (7.5 IRE).
The system frequency is 59.94i.
b) The composite signal output from this camcorder
is an NTSC signal with no black setup. The
system frequency is 59.94i.
c) The composite signal output from this camcorder
is a PAL signal. The system frequency is 50i.
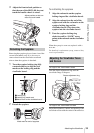
4 Set the following items.
• Time Zone
• Date/Time
See “Basic Setup Menu Operations”
(page 109).
5 Turn the MENU knob to select
“Finish”, then press the MENU knob.
The camcorder is now ready for use.
You can set or change the date and time of the
internal clock. The date and time set are reflected
in the timecode.
For menu operations, see “Basic Setup Menu
Operations” (page 109).
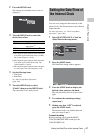
1 Select MAINTENANCE >Clock Set
>Date/Time in the setup menu.
2 Press the MENU knob.
The Date/Time setting window appears.
3 Turn the MENU knob to display the
desired value, and press the knob.
The selection shifts to the next item on the
right.
4 To continue the remaining settings,
repeat step 3.
5 Making sure that “SET” is selected,
press the MENU knob.
The internal clock is set with the date and
time set in steps 3 and 4.
To cancel the setting
Before executing step 5, push the MENU
CANCEL/PRST/ESCAPE switch up to the
CANCEL/PRST side.
Setting Area of use
NTSC Area NTSC area (for areas other
than Japan)
a)
NTSC(J) Area NTSC area (Japan)
b)
PAL Area PAL area
c)
Setting the Date/Time of
the Internal Clock