


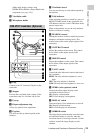


Attaching the Viewfinder
37
Chapter 2 Preparations
CAUTION
When the viewfinder is attached, do not leave the
camcorder with the eyepiece facing the sun. Direct
sunlight can enter through the eyepiece, be focused in the
viewfinder and cause fire.
Note
The viewfinder is supplied separately.
The following procedure is an example for attaching the
HDVF-20A.
For procedures for attaching other viewfinders, refer
to a manual supplied with each viewfinder.
Note
When attaching the viewfinder, make notes of the
following points.
• Be sure to the power off the camcorder before coupling
the viewfinder connector to the camcorder’s VF
connector (20-pin). If you make this connection when
the camcorder power is on, the viewfinder may not
function properly.
• Couple the viewfinder connector firmly to the
camcorder’s VF connector. If the coupling is loose,
noise may appear on the video or the tally light may not
operate properly.
For more information about the connection of the
viewfinder and camcorder, contact a Sony service
representative.
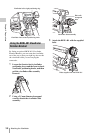
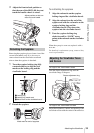
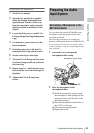
1 1 Loosen the viewfinder left-to-right
positioning ring, 2 attach the
viewfinder to the viewfinder fitting
shoe, and 3 tighten the viewfinder left-
to-right positioning ring.
2 Couple the viewfinder connector to the
VF connector (20-pin).
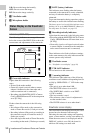
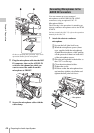
Detaching the viewfinder
You can carry out this by following the attaching
procedure in reverse order, but there is an
additional action to take: when detaching the
viewfinder from the fitting shoe, pull up the
stopper.
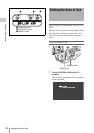
To adjust the viewfinder left-right position,
loosen the left-right positioning ring, and to adjust
the front-back position, loosen the front-to-back
positioning knob.
Attaching the Viewfinder
Attaching the Viewfinder
Adjusting the Viewfinder Position
Stopper
Viewfinder left-to-right positioning ring
VF connector (20-pin)