


10
Installation
Chapter 2
Preparations
Installation
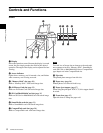
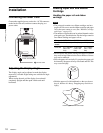
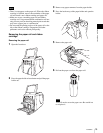
Connecting the Power Cord
Connect the supplied power cord to the ~ AC IN connector
on the back of the unit, and then connect the plug to a
power outlet.
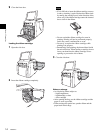
Adjusting the Display Angle
The display angle can be adjusted to make the display
more easily viewable. Eight settings are available for angle
adjustment.
When storing the unit, pull the display forward until
completely upright and then push it backward until
horizontal.
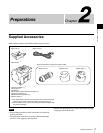
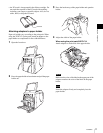
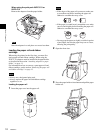
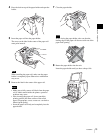
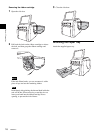
Loading Paper Roll and Ribbon
Cartridge
Handling the paper roll and ribbon
cartridge
• The print pack contains two ribbon cartridges and two
paper rolls. Be sure to use the ribbon cartridge and paper
roll in the same carton as a set. (See “Ribbon Cartridge
and Paper” on page 55.)
• The number of sheets that can be printed depends on the
print pack type. The table below lists the image count for
one ribbon cartridge and paper roll set.
• Do not replace the ribbon cartridge and paper roll before
they are used up. Otherwise the above number of sheets
may not be achieved.
• Place the paper roll vertically. If you place the paper roll
horizontally, the paper roll may roll around and fall. This
may cause an injury.
• Hold the paper roll with both hands so that you do not
drop it, because it is heavy. Dropping may result in an
injury.
Power cord (supplied)
Power outlet
Notes
Print pack 2UPC-C13 2UPC-C14 2UPC-C15
Number of
sheets
300 (sheets) 200 (sheets) 172 (sheets)
Print size 3.5 × 5 inches
(89 × 127
mm)
4 × 6 inches
(102 × 152
mm)
5 × 7 inches
(127 × 178
mm)
Hold the paper roll with both hands.