


9
Controls and Functions
Chapter 2
Preparations
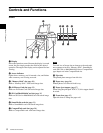
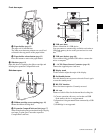
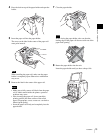
Front door open
A Paper holder (page 12)
The paper roll is inserted here.
The white areas between printouts are cut off and
collected in the top portion of the paper holder.
B Paper holder release button (page 12)
Press this button to remove the paper holder.
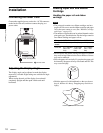
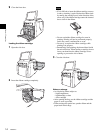
l Side door (page 14)
Open this door for replacing the ribbon cartridge and
inserting the expansion CompactFlash card.
Side door open
A Ribbon cartridge access opening (page 14)
Mount the ribbon cartridge here.
B Expansion CompactFlash card slot (page 17)
When using border print, promotional images display,
text input, or print spool, insert the expansion
CompactFlash card here.
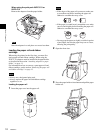
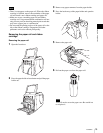
Rear
a USB port (host)
Allows connection of a USB device.
You can connect a commercially available card reader or
USB flash memory device to this port and use it to read
data.
*1)*2)*3)
b USB port (device) (page 48)
Use a commercially available USB cable to connect the
unit to a computer.
*2)
c ~ AC IN (Power Source) Connector (page 10)
Connect the supplied power cord here.
d Display stand
Use this stand to adjust the angle of the display.
e On/Standby button
Press this button to turn on power to the unit. Press it again
to enter the standby mode.
f RS-232C interface
Serves for future expansion. Currently not used.
g Air vent
Features a built-in filter for the thermal head cooling fan.
*1) Correct operation with every card reader and USB
flash memory device is not guaranteed.
*2) Operation is not guaranteed when connected by a USB
hub.
*3) PictBridge is not supported.
AB
A
B
1
2
3
5
4
6
7