


H8DI3+/I+(-F) Serverboard User's Manual
2-4
2-3 Mounting the Serverboard into a Chassis
All motherboards have standard mounting holes to fi t different types of chassis.
Make sure that the locations of all the mounting holes for both the serverboard
and the chassis match. Although a chassis may have both plastic and metal
mounting fasteners, metal ones are highly recommended because they ground
the serverboard to the chassis. Make sure that the metal standoffs click in or are
screwed in tightly.
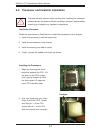
Check the Compatibility of the Serverboard Ports and the I/O Shield
The H8DI3+/I+(-F) Serverboard serverboard requires a chassis that can 1.
support a board of 16.64" x 6.8" in size. It was designed to be used in a
Supermicro 1U Twin system.
Make sure that the I/O ports on the serverboard align with their respective 2.
holes in the I/O shield at the rear of the chassis.
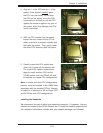
Mounting the Serverboard onto the Tray in the Chassis
Carefully mount the serverboard onto the serverboard tray by aligning the 1.
serverboard mounting holes with the raised metal standoffs in the tray.
Insert screws into all the mounting holes in the serverboard that line up with 2.
the standoffs.
Then use a screwdriver to secure the serverboard to the mainboard tray 3.
- tighten until just snug (if too tight you might strip the threads). Metal
screws provide an electrical contact to the serverboard ground to provide a
continuous ground for the system.
Exercise extreme caution when installing or removing memory mod-
ules to prevent any possible damage.
!
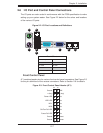
2-4 Installing Memory
Installing Memory
Insert each memory module vertically into its slot, paying attention to the 1.
notch along the bottom of the module to prevent inserting the module
incorrectly (see Figure 2-1).
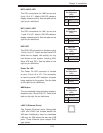
Install to slots CPU1/DIMM1A and CPU1/DIMM1B fi rst, then to CPU1/2.
DIMM2A and CPU1/DIMM2B, etc. Always install in pairs and in the numerical
order of the DIMM slots. See support information below.