


UVS-7111 User's Manual
Hardware Installation
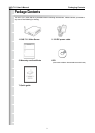
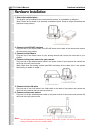
1. Select the installed place
This product can be installed on any convenient at surface, or concealed in a ceiling etc. .
(Note: Please do not install in an enclosed unventilated space. Doing so might cause abnormal
operation for the product.)
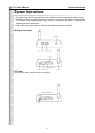
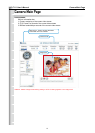
2. Connect to the RS-485 interface
Plug one end of your control cable in the RS-485 socket on the back of the camera and connect
the other end to your product.
3. Connect to the Video In
Plug one end of the video source of your analog camera and connect the other end to your
product.
4. Connect to the power source for your camera
Plug one end of the attached power cable in the power socket of your camera and connect the
other end to the AC power source.
(Note: Make sure your analog camera uses BNC connectors for the video in/out. If not, please
check with your dealer or retailer.)
5. Connect to the LAN cable
Plug one end of your LAN cable in the LAN socket on the back of the product and connect the
other end to the network that you want to access to.
6. Connect to the power source
Plug one end of the attached power cable in the power socket of the product and connect the
other end to the AC power source.
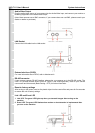
Note :
You can specify three LED statuses by setting: 1.ON; 2.OFF; 3.Flash. For more information about
setting of LED status, refer to the “System Setting”.
8
Hardware Installation