


38
(5) [AutoIP]
Set AutoIP to [Disable] or [Enable].
(6) [IPv4 Address (AutoIP)]
When [Enable] is selected in (5), an automatically set
IP address is displayed.
IPv6
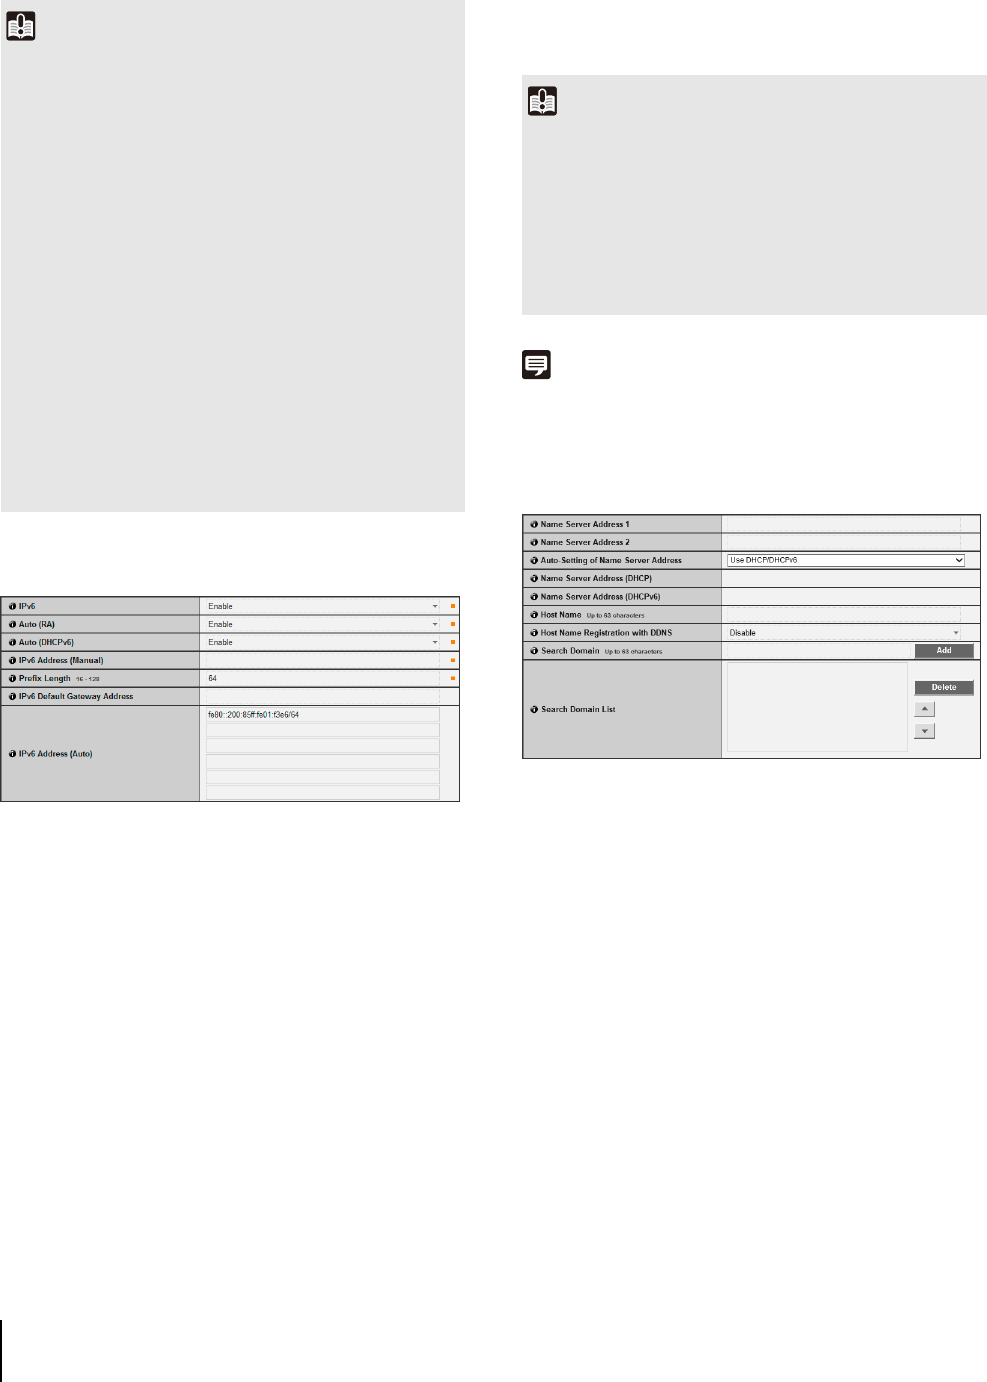
(1) [IPv6]
Set IPv6 use to [Disable] or [Enable].
(2) [Auto (RA)]
Select [Enable] to set an address automatically using
RA (Router Advertisement, network information
automatically transmitted from a router), or select
[Disable] not to set an address automatically.
(3) [Auto (DHCPv6)]
Select [Enable] to use DHCPv6 to set an address
automatically or [Disable] not to set an address
automatically.
(4) [IPv6 Address (Manual)]
Enter a fixed IPv6 address.
(5) [Prefix Length]
Enter a prefix length from 16 to 128 if [Disable] is
specified in (2).
(6) [IPv6 Default Gateway Address]
Enter a default gateway address if [Disable] is
specified in (2). Be sure to set when connecting the
camera to a different subnet from that of the viewer.
(7) [IPv6 Address (Auto)]
If [Enable] is specified in (1) and [Enable] is specified
in (2) and (3), then the automatically acquired address
will be shown.
Note
In an environment where IPv6 cannot be used, if IPv6 is set to
[Enable] and auto is set to [Enable], then the [IPv6 Address
(Auto)] field will display the link-local address only.
DNS
(1) [Name Server Address 1], [Name Server Address 2]
Enter the name server address you want to register.
To register only one address, keep the [Name Server
Address 2] field blank.
(2) [Auto-Setting of Name Server Address]
Select the method for setting the name server address
automatically using DHCP. Select [Use DHCP] to use
a name server address obtained automatically from
the DHCP server. Select [Use DHCPv6] to use a name
server address obtained automatically from the
DHCPv6 server. Select [Use DHCP/DHCPv6] to use a
name server address obtained automatically from the
DHCP server or DHCPv6 server. Select [Disable] if not
using DHCP.
To set [Use DHCP], select [Auto (DHCP)] in [IPv4
Address Setting Method].
To set [Use DHCPv6], select [Enable] in [IPv6], then
select [Enable] in [Auto (DHCPv6)].
Important
• Contact your System Administrator for the [IPv4 Address],
[Subnet Mask] and [IPv4 Default Gateway Address].
• The camera's IP address cannot be set to an IP address that
starts with 127., such as 127.0.0.1.
• If any of the [IPv4 Address], [Subnet Mask] or [IPv4 Default
Gateway Address] settings are wrong, network access may
be disabled. In this case, see “Performing Initial Settings for
the Camera” (p. 28) and use VB Initial Setting Tool to set the
address again.
• The camera may become inaccessible from the active web
browser if settings are changed in [IPv4 Address], [Subnet
Mask] or [IPv4 Default Gateway Address]. Check beforehand
the precautions in “Important” in “[Reboot Item] Setting Items
Requiring Rebooting” (p. 72).
• If [Auto (DHCP)] is selected as the IPv4 address setting
mode, the IPv4 address may not be assigned correctly in
certain environments, such as when a router is present
between the DHCP server and the camera. In this case,
assign a fixed IPv4 address from the [Manual] settings.
Important
• Contact your System Administrator for the [IPv6 Address
(Manual)], [Prefix Length] and [IPv6 Default Gateway
Address].
• The camera may become inaccessible from the active web
browser if settings are changed in [IPv6], [IPv6 Address
(Manual)], [Prefix Length] or [IPv6 Default Gateway Address].
Check beforehand the precautions in “Important” in “[Reboot
Item] Setting Items Requiring Rebooting” (p. 72).