


18 19
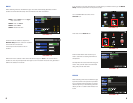
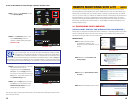
To set up the DVR for access through a dynamic domain name:
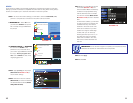
STEP 1. Return to the Network window
in the Setting Menu.
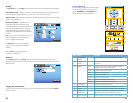
STEP 2. In the Network window, click
on the DDNS Setup button to
generate a DDNS setting dialog box
(Picture 1-35)
PICTURE 1-33
PICTURE 1-34
PICTURE 1-35
You are now able to access the DVR remotely over the Internet by entering the domain name
into a browser window.
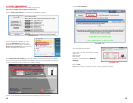
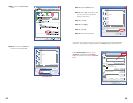
STEP 3. Enter the User Name, Password
and Domain Name that you
registered for through http://myq-
see.com. Click the Apply button at
the bottom of the screen and then the
Exit button. This should return you to
the Network Setup menu.
STEP 4. Click the Apply button and then
the Exit button at the bottom of the
Network Setup Screen and your
DDNS setup is complete.
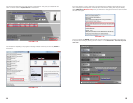
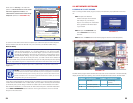
NOTE! You will need to enter your Primary or Public DNS. This can be found
in your router status tab. To locate this, enter the Gateway address number
that appears in your Network Settings (or which you wrote down while setting
up Static IP) into a browser window on a computer that is connected to the
same router as your DVR. This will open your Router’s information window. Click on Status (or
the equivalent - each brand is different) to view your DNS numbers. You will only need the first.
If your router does not list the DNS address, you will need to call your Internet Service Provider.
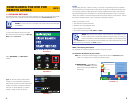
Once you have configured the network settings on the DVR to match those on your router
and forwarded the ports needed by the DVR to enable remote access over the Internet, you
will be ready to remotely view your cameras using a webcam program based on an ActiveX
control. For this to work, you will have to enable the ActiveX control options that are built into
Internet Explorer. It is strongly suggested that you be running the latest version of Internet
Explorer (currently IE8). The instructions below will describe the process using that version of
the browser. Instructions for users with IE6 or 7 are available in the Resources library of our
Technical Support page.
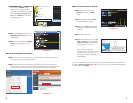
2.1 CONFIGURING YOUR COMPUTER
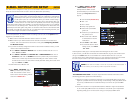
USER ACCOUNT CONTROL FOR WINDOWS VISTA AND WINDOWS 7
Some users of computers using Windows Vista or Windows 7 operating systems may receive
an error message informing of a codec that is missing or not installed. This conflict can be
resolved by turning off User Account Control (UAC).
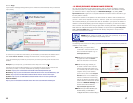
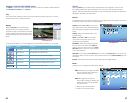
Windows Vista
STEP 1. Open the Control Panel
(accessible by clicking on the
Windows icon in the lower left of your
screen.
STEP 2. Select User Accounts and
Family Safety.
STEP 3. Select “Add or Remove User
Account.”
STEP 4. Select the desired user account.
PICTURE 2-1
PICTURE 2-2
PICTURE 2-4
PICTURE 2-3
REMOTE MONITORING WITH A PC
CHAPTER 2