


32 33
E-MAIL NOTIFICATION SETUP
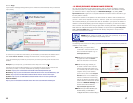
Your DVR can be configured to notify you via e-mail when it detects motion. You will need to
set up an account which DVR can use to send out alerts before proceeding.
PICTURE 3-1
NOTE! Depending upon your settings, the system can generate a lot of e-mail
alerts. For that reason, we recommend setting up a dedicated e-mail address
specifically for the system to send alert notices. If you do not have your own
e-mail system (such as a corporate mail server) you should consider using a
free e-mail provider. However, because many free e-mail services allow only
a limited amount of e-mail traffic we specifically recommend using Google’s
Gmail service with its higher limit. Similarly, you will want the alert e-mails to go to a different
account than the one sending them. This will ease your management of these alerts. We
specifically recommend agains using Yahoo or Hotmail for this function as both services limit
the number of e-mails that can be sent out on a daily basis. Upon exceeding that limit, your
account will no longer send alerts for that time period.
For the example below, we will use Gmail. The settings can be found under Options when
logged into your Gmail account.
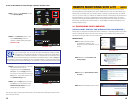
1. Make sure that the DVR’s firmware version is 090716 or newer
2. Make sure that your DVR has been set for network access and can be seen from
internet. This was covered in the first section of this guide, Configuring the DVR
for Remote Access.
3. If you have not already configured the DVR to record when it detects motion, you will
need to follow these instructions:
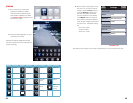
A. Go to MENU - DEVICES - MOTION. Turn on all the cameras and set to 2 or 3.
Click APPLY and EXIT
B. Go to MENU - RECORD and RECORD SET - TIME SCHEDULE and click on
SCHEDULE, then click on ALARM at the bottom (check mark), then schedule
which hours of which days will have the DVR looking for motion events. These
should not be for hours or areas which normally see traffic during the course of the
day. Click APPLY and EXIT.
The DVR will record on Motion now.
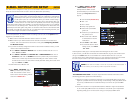
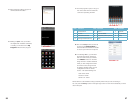
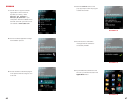
4. Go to MENU - NETWORK, and on
DNS, you need to put your public
DNS. This number is shown in the
bottom of the network setting window
as shown in Picture 3-1.
CHAPTER 3
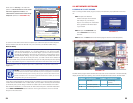
There might be a delay (up to one hour) before the DVR begins to send e-mail.
If, after an hour, you still have not received an email notification, log into your Gmail account
and go to the Sent folder and to see whether an e-mail has been sent out. If you your
account shows that e-mails have been sent, go to your receiving e-mail account and check
the Junk or Spam folder to see if the e-mails have been diverted to that location.
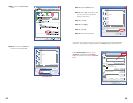
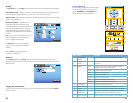
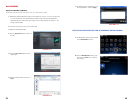
5. Go to MENU - DEVICE - ALARM
- EMAIL SETUP: (Picture 3-2)
Example here for GMAIL account
(recommended), if you don’t have Gmail
account, go www.gmail.com and
sign up:
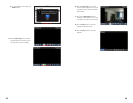
A. Turn ON email (Picture 3-3)
B. SSL : ON
C. Port : 00465
D. smtp: smtp.gmail.com
E. Send email: youremail@
gmail.com
F. Password: your password for
the gmail account
G. Recv email: use a different
e-mail address to receive
notifications.
H. Click APPLY - OK - EXIT
I. You should be back to Alarm
setting screen, click APPLY
- OK - EXIT.
PICTURE 3-3
NOTE! Some makes and models of routers do not provide a Public DNS address. In
such an instance, you should call your ISP to request that information.
PICTURE 3-2
TROUBLESHOOTING TIPS: If the above steps have been followed and there is still no
email being generated, please check the following:
1. What kind of router is connected to the DVR? If you have 2WIRE brand router, there
might be a problem with this router sending out email using a third party SMTP server.
You can try a different brand of router like Linksys or DLink or use your ISP SMTP
server.
2. If this DVR is located in a corporate office behind a firewall, it might not be allowed
to use a third party SMTP server. You will need to consult with your IT department
regarding setting up an e-mail account using your company’s SMTP server.