


24 25
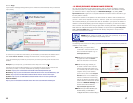
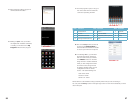
PICTURE 2-16
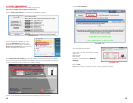
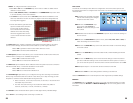
Scroll down to “Security”, and select the
options to “Allow software to run or install
even if the signature is invalid”, and
“Allow Active Content to Run Files on My
Computer” (RED box in PICTURE 2-16).
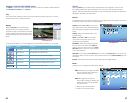
To connect to the DVR from the remote computer you would then open an Internet Explorer
browser window and enter the internet IP of your router that you obtained earlier during
Network Setup.
Once you are able to login, you will get the login screen, by default there is no password. Just push the
Login Button .
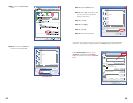
Internet Properties
Internet Properties
?
X
General
Privacy
Content
Connections AdvancedPrograms
Security
Apply
Cancel
OK
Home page
Browsing history
Search
Tabs
Appearance
Colors
Languages
Fonts Accessibility
Settings
Settings
SettingsDelete...
Use BlankUse DefaultUse Current
To create home page tabs, type each address on its own line.
Delete temporary files, history, cookies, saved passwords,
and web form information.
Delete browsing history on exit
Change search defaults.
Change how webpages are displayed in
tabs.
http://www.q-see.com
Internet Properties
Internet Properties
?
X
General Privacy Content Connections AdvancedPrograms
Apply
Cancel
OK
Security
Settings
*Takes effect after you restart Internet Explorer
Reset Internet Explorer settings
Reset...
Security
Reset...
Restore advanced settings
Resets Internet Explorer’s settings to their default
condition.
You should only use this if your browser is in an unusable state.
Some settings are managed by your system administrator.
Allow active content from CDs to run on My Computer*
Allow active content to run in files on My Computer*
Allow software to run or install even if the signature is invalid
Check for publisher’s certificate revocation
Check for server certificate revocation*
Check for signatures on downloaded programs
Do not save encrypted pages to disk
Empy Temporary Internet Files folder when browser is clos
Enable DOM Storage
Enable Integrated Winsows Authentication*
Enable memory protection to help mitigare online attacks*
Enable native XMLHTTP support
Enable SmartScreen Filter
NOTE! If you cannot use HTTP port 80 or 9000 because the port is being
used by another program, or it is being blocked by your service provider,
you can use another port in the same range. If you do so then you need to
forward the IP address of the router to the other port, change the port in the
DVR NETWORK settings, and you need to add the port number after the IP
address. For example, if you set the HTTP port as 82, you need to enter the IP address as
192.168.0.25:82. After you have forwarded the ports you can verify that the ports are open by
going to canyouseeme.org from a computer that is attached to the same router as the DVR.
NOTE! If you are still experiencing problems connecting remotely, anti-virus programs
could also block the ActiveX control. Deactivate any anti-virus programs for the duration
of your remote monitoring sessin. Similarly, other plug-ins could also block ActiveX. Close
firewalls in Windows and in the router if applicable. Remember to restore your security
settings after exiting the monitoring session.
If you have a router plugged into another router, for example, if you have the DVR attached to
a router which is attached to DSL or Cable router, you may need to forward port 80 and 9000
(or whatever ports you are using) on the DSL or Cable router to the IP address of the router
that the DVR is attached to, so that router can then forward the port to the DVR. Please refer
to the PORT FORWARDING section above on how to get instructions on how to forward
the port on the other router.
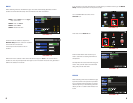
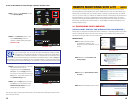
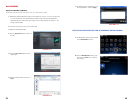
2.2 NET-VIEWER SOFTWARE
LOGGING IN TO NET VIEWER
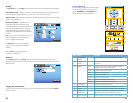
Prior to running the Net Viewer program, ensure your browser’s pop-up blockers are turned
off.
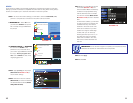
STEP 1. Open an IE Browser
window and input the IP address
and web port of your DVR (i.e.,
http://172.18.6.202/) into the address
bar to generate a Net Viewer User
Log-in screen.
STEP 2. Input the PASSWORD and
select NETWORK from the drop
down list.
PICTURE 2-17
PICTURE 2-18
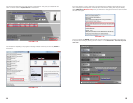
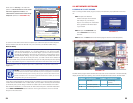
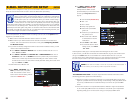
STEP 3. Click on LOGIN and the Net Viewer program will show a live feed (below).
The Net Viewer program allows full remote access and control of the DVR. It will automatically
display the live feed upon opening. The controls will replicate those found on the DVR itself.
NUMBER DESCRIPTION NUMBER DESCRIPTION
1 Menu Bar 2 PTZ Panning
Controls
3 PTZ View Controls 4 PTZ Preset Controls
5 - 9 Live Viewing Controls