


6 7
PICTURE 1-7
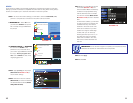
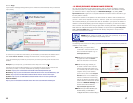
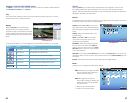
B. WINDOWS VISTA and WINDOWS
7 – Click on the START menu
(Windows icon) in the lower left of
your screen. Type “cmd” into the field
that says, “Search programs and
files” and hit ENTER or click on the
magnifying glass icon.
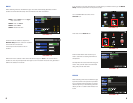
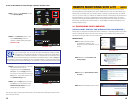
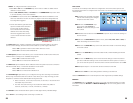
PART 2: Activating UPnP in the Router
STEP 4. Enter the router’s IP address into the address field in a web browser window.
This will open your router’s settings window.
STEP 5. Activate UPnP. Each manufacturer uses their own method for locating and
activating UPnP as shown by the red boxes in the example pictures below. Again, you
should consult your router’s manual or the manufacturer’s website for specifics.
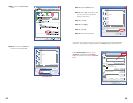
STEP 2. Type “ipconfig” at the prompt
(Red arrow in Picture 3) to access
router settings.
STEP 3. The “Default Gateway” (Yellow
arrow) is the IP address for your
router.
PICTURE 1-5
PICTURE 1-6
PICTURE 1-8
Microso Office Outlook 2007
Scky Notes
All Programs
Devices and Printers
Default Programs
Help and Support
Shut down
iTunes
Adobe Acrobat
cmd
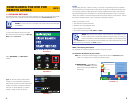
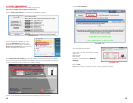
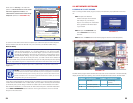
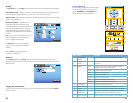
PART 3: Activating UPnP in the DVR
STEP 6. On the DVR, access the
Network menu from the Main
menu.
UPNP ON
1
2
3 4
PICTURE 1-9
PICTURE 1-10
STEP 7. Set Network Type to DHCP
and click ON next to UPNP.
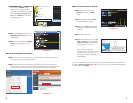
STEP 8. Click on Apply and then OK
to save your settings before exiting
this menu.
STEP 9. Restart your DVR.
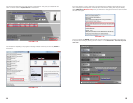
STEP 10. Check the status of ports 80,
9000 and 18004, by going to www.
canyouseeme.org and entering the
port numbers one at a time.
If you receive the “Success!”
message then you are ready to begin
remotely monitoring your DVR by
entering the IP address displayed by
CanYouSeeMe.
If you do not receive the “Success!” message, you should change the port number listed to
the right of Web Port (see Picture 1-9) from 80 to 85 or 89 in the Network Settings Menu
and begin again with Step 8.