


30 31
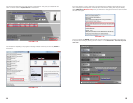
Setting
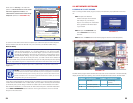
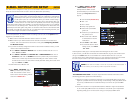
The SETTING tab on the Setup menu allows the control of the Net-Viewer program settings.
Internet Bandwidth - Select your system’s Internet bandwidth from the drop down menu. If
you are experiencing jerky playback, you may wish to choose a lower setting.
File Save Path - Select the path where video and still images taken from the DVR should be
saved on your computer.
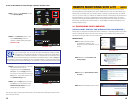
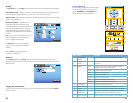
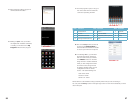
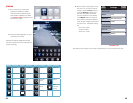
PTZ CONTROLS
The PTZ controls operate in the same manner
as those on the DVR. For more information,
refer to PTZ Setup and PTZ Control on
pages 26 and 27 of the User Manual.
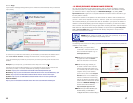
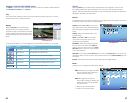
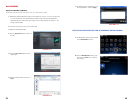
IE Password Enable - This allows you to
require that users enter a password when
accessing the DVR from Internet Explorer. This
password can be different than those used
to access the DVR directly. Admin and User
passwords allow different levels of control over
the DVR.
DST - Turns on or off Daylight Savings Time.
Select the starting and ending dates and
times of Daylight Savings Time.
The DEFAULT button will reset all Alarm
options to their original factory installed
settings
Select APPLY to save settings before
continuing to another tab.
PICTURE 2-24
PICTURE 2-25
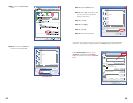
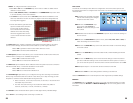
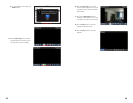
Host Info
The HOST INFO tab on the Setup menu shows the remaining amount of space and
recording time on the HDD. It also shows the version of the Net Viewer software and lists the
MAC Address.
1
2
3
4
5
6
7
8
Logging Out of Net-Viewer
To log out of the Net-Viewer program, go to the main interface window and select LOGOUT
from the toolbar.
Item Name Function
1 PTZ Panning
Direction
Controls the panning direction of the PTZ Camera
2 Zoom, Focus
and Iris
Increase or decrease the zoom, focus or brightness of
the picture
3 Settings CUR Displays current action. Enter a preset’s number
manually in the accompanying box
LOAD Reloads the last saved setting
SAVE Saves the current setting
SET Choose from a preset
GOTO Goes to a specific preset
CLS Clears the currently running action
CRUISE Choose from a preset bit rate setting
4 Live Display Turns the Live Display On or Off
5 Screen Capture Captures a screen image and saves it to your PC
6 Record Record images to your DVR system from Net Viewer
7 Channel
Display Grid
Choose from full screen, 4-Channel, 8 Channel and
16-Channel view mode, depending on model.
8 Volume Control Adjust the volume if the camera is audio capable
PICTURE 2-26