


26 27
VIEWING LIVE AND RECORDED VIDEO
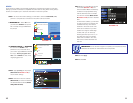
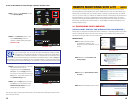
The Menu is located on the top left hand side of the screen. This toolbar includes selections
for LIVE, REPLAY, SETUP, and LOGOUT.
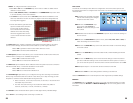
Live
This is the normal operating mode and is the mode that the program opens up to, showing
the live feed from any connected cameras.
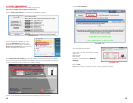
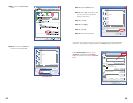
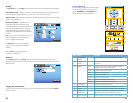
SETUP
Selecting SETUP from the Net-Viewer toolbar will allow the configuration of the controls
for recording preferences, alarm preferences, PTZ controls and the network and system
settings. The various tabs within this Setup sub menu are RECORD, ALARM, PTZ CONTROL,
NETWORK, SETTING, and HOST INFO:
Record
The RECORD tab in the Setup menu, allows you to configure the recording status of the DVR
in a similar manner to the controls on the DVR itself.
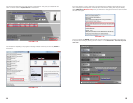
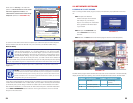
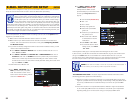
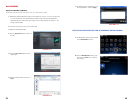
Replay
Selecting REPLAY from the Net-Viewer
toolbar will allow you to replay previously
recorded footage. To find previously recorded
footage, select the date from the menu, a file
list will be displayed, choose the file from the
file list.
PICTURE 2-19
PICTURE 2-20
PICTURE 2-21
A set of buttons allows you to control playback and save the file for viewing on a computer.
Button Name Function
Play Button Play or pause recorded footage
Stop Button Stop playing recorded footage
F.F. Button Fast forward through recorded footage
Slow Button Decrease playback speed of recorded footage
Next Frame Playback recorded footage frame by frame
264 TO AVI Button Convert file from H.264 to AVI
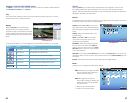
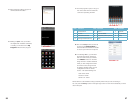
Channel: Select ON or OFF from the drop
down menu next to each channel Resolution:
select the preferred resolution of the recorded
image
Quality: Select the preferred quality of the
recorded image
Audio: Select ON or OFF from the drop
down menu for the audio control if your
camera has audio capability.
Rec Mode: Select the recording mode from
the drop down menu. Select the ALWAYS
option to record 24 hours a day, or the TIME
RECORD option to record on a set schedule
or on motion detection.
Schedule: If you select the Time Record option, click on the Schedule button to set up the
schedule for when you want to record. This works the same as in the Record Setup function
in the DVR.
Default: This will restore all options to their original factory-installed settings.
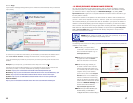
Alarm
This allows you to configure the DVR’s alarm settings.
STEP 1. Select the channel(s) associated
with the camera(s) and configure all
options under that column
STEP 2. Configure each camera’s
sensor alarm settings by selecting the
desired option from the I/O ALARM
drop down menu.
• Select NO for normally opened
• Select NC for normally closed.