


basics guide
get started
9
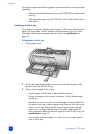
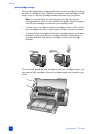
4 Adjust the paper width guide and the paper length guide to fit close to the
edges of the paper without bending the paper. This adjustment helps the
paper feed straight into the printer.
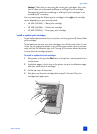
5 Lower the paper catch.
6 Pull out the photo tray slider until it stops. This action disengages the photo
tray so the printer uses the paper in the In tray.
load paper in the photo tray
Use the photo tray when you want to print on 4 x 6 inch (10 x 15 cm) photo
paper or L-size cards (3.5 x 5 inches, 90 x 127 mm).
Note: For information about storing and handling the photo paper, see the
HP Photosmart Printer Help.
Tip: If you want to print 4 x 6 inch (10 x 15 cm) borderless photos, be sure
to use HP premium plus photo paper, glossy 4 x 6 borderless. If you are
printing from the control panel, check that your printer is set to print
borderless photos. If you are printing from a software application, select the
appropriate borderless paper size from the Print dialog box.
When you use the photo tray, you can leave paper in the In tray. If you run out
of photo paper in the photo tray, the printer continues to print using paper from
the In tray.
Tip: To print many photos at once, load the In tray with additional photo
paper.
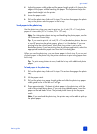
To load paper in the photo tray:
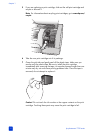
1 Pull out the photo tray slider until it stops. This action disengages the photo
tray.
2 Lift the paper catch.
3 Pull out the photo tray paper length guide and slide the photo tray paper
width guide as far to the left as it will go.
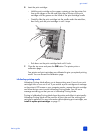
4 Place approximately 15 sheets of photo paper in the photo tray with the
side to be printed facing down. If you are using tabbed paper, insert the
paper so the tab feeds in last. The printed photo faces up on the paper
catch.
Note: If you overload the photo tray, the printer may not be able to pick up
the photo paper.