


Cintel International Ltd. diTTo User Guide
Issue 3 8
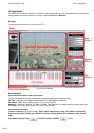
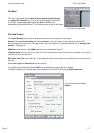
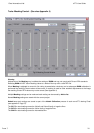
System Status
This shows the amount of local RAID free Disk Space in terms of GBytes, Frames, as well as a visual indicator
(The space is dependent on the Resolution value set in Scan control window.)
A Browse control for setting a manual (crash recording) destination is included.
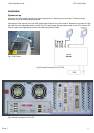
A or B wind settings for the Feed and Take Up Reels. Only available in Unloaded mode (see Lacing Film Page 21)
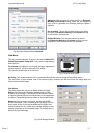
Clip Entry
Clips can be created by using the Mk In and Mk Out buttons. Uses (Transport Time code as reference)
diTTo control includes Edit Decision List (EDL) management. See Clip Management below.
Keycode displays the current frame Keykode (if the optional reader is fitted)
Timecode window. Allows keyboard entry of timecode for diTTo to be cued to, or for setting the main diTTo timecode.
(This window is NOT used for editing EDL lists).
T/code format menu provides a choice of global timecode type. H:M:S:F, Foot:Frames, Frames
Current Tape. The appropriate alpha-numeric entry must match that of the clip list Lab-Roll or Tape, to allow
a conformed recording.
TC CUE will cause diTTo to transport the film to the timecode entered in Clip Entry Timecode window.
TC SET will set diTTo’s counter to the timecode entered in Clip Entry Timecode window
COMMIT ALL will activate all changes made to the EDL list shown in the Clip Display.
CONFORM ALL will cause diTTo to perform all committed scans created in the EDL and shown in the Clip Display.
CLEAR EVENTS will clear all clips from the Clip Display List. (An option will displayed to delete recorded files as well)
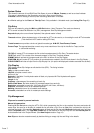
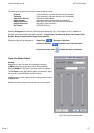
Clip Display
This window shows Clip listings as edit decision lists (EDL). The listing includes:
Clip number
Tape, an alpha-numeric value
Lab-Roll, an alpha-numeric value
In Point of clip
Keykode, if available. If no Keykode reader is fitted, only imported ALE list Keykodes will appear.
Out Point of clip
Length of clip
Progress, a percentage of the recording of each clip
Record Path Name, the folder location of recorded images from each clip
Resolution, selectable for each clip. (2K Colour,2K Mono, 4K Colour, 4K Mono).
Exposure, selectable from a list of created exposures.
Masking, selectable from a list of created mask settings.
Pre-scale, selectable from a list of created pre-scale settings.
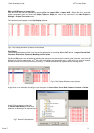
Clip Management
Clips can be created by several methods
Manual clip generation.
Entering In and Out points using the diTTo GUI, while transporting the film to the required clip starts and ends will
create clips. As soon as an In point is created the list will show a clip. Once an Out point is entered the clip list will
calculate the length. (If the optional Keykode reader is fitted and the film has valid Keykode the In point entry will also
create a Keykode value). The Tape/Reel number will be that entered in the Clip Entry box and the Record path will
be that determined in the Project Wizard. (See New Project creation. Page 12).
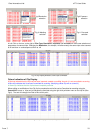
New Clips can also be created manually by double clicking an empty clip line and filling in the details.