


8
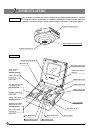
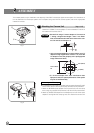
Fig. 1
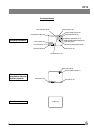
Fig. 2
ASSEMBLY
This chapter pertains only to installation and assembly of the DP-12 microscope digital camera system. For instructions on
how to assemble the microscope system and TV adapter being used with the camera system, refer to the appropriate
instruction manuals.
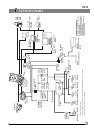
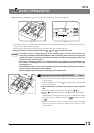
1 Attaching the Camera Unit
(Figs. 1 & 2)
Screw the U-TV0.5XC C-mount adapter 1 into the threaded C-mount on
the bottom of the camera unit 2.
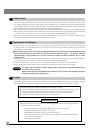
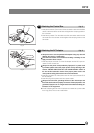
CAUTION
· Be careful in using a C-mount adapter or C-mount lens
¬ having a longer thread length ® than 7 mm. Other-
wise, the threaded section will hit the inside of the cam-
era unit and cause damage to it.
· As the photographed field is as shown below, use a TV
adapter having magnification of 0.5X to 1X. (If a 0.35X
TV adapter is used, the periphery of the photographed
image will become dark.)
· If a C-mount adapter from other manufacturer than
Olympus is used, the optical performance of the system
may not be manifested fully.
Field number
22
0.5X (FN 18)
1X (FN 9)
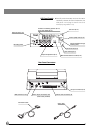
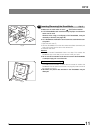
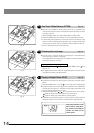
When using the STS adapter
}The DP-TRAD tripod adapter is provided with two types of screws (2 each)
and an Allen wrench. Use only the Phillips screws (x 2) with the DP12.
1. Attach the DP-TRAD tripod adapter 3 to the camera unit 4 and clamp
them using the provided Phillips screws (x 2) with a Phillips screwdriver.
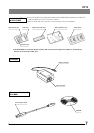
2. Attach the PV-STS STS adapter to the threaded tripod hole of the tripod
adapter 3 and tighten the clamping knob 5 to secure the camera unit.
B
A
1
2
3
4
5