


Copyright© 2002-2003 Pacific Digital Corporation Page 37
9.2.3 Configure Slides
This menu lets you set or change the same settings as the Digital
PixMaster PC Application allows you to set/change. This allows you to
use the MemoryFrame without a PC, or change settings originally set
with the PC application with the on-board button Menu system. This
method is not as fast as the PC. To enter the Configure Slides sub-menu,
highlight the Configure Slides entry by using the Forward (►) or
Reverse (◄) button and then press the Select button.
Important! On any menu that has thumbnail images, the
thumbnails will take a few moments to appear, and you will be
unable to select a picture or move the highlight until ALL of the
thumbnails have appeared in their entirety.
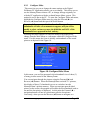
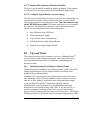
Selecting this menu option will cause the menu being displayed to
change from the Main Menu to a sub-menu called the Configure Slides
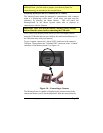
menu. For this menu, the focus is initially on thumbnails of the stored
pictures as depicted in the Figure 18.
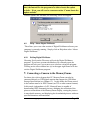
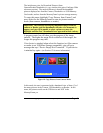
Configure Slides
PRESS REVERSE, FORWARD,
SELECT
Transition: type
Duration: time
Show This Slide:
Delete Slide
Rotate 90 Degrees
Select Another
Record Audio
Exit Config Menu
Figure 18- Configure Slides Menu
In this menu, you are first presented with a thumbnail view of three (3)
of many pictures stored in the MemoryFrame.
You can navigate through the pictures using the Forward (►) and
Reverse (◄) buttons. Since the MemoryFrame can hold 32+ pictures,
this display of three (3) thumbnails serves as a window into the
MemoryFrame’s picture memory. When you navigate past the third
picture on the screen, the program will render the next thumbnail, and so
on until the last picture is displayed. At this point the Forward (►)
navigation button will not let you advance past the last picture.
Conversely, when you use the Reverse (◄) button to navigate to a