


51
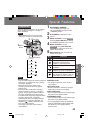
Special Features
Special Features
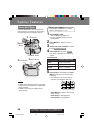
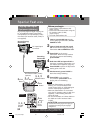
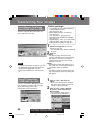
Video In
S-Video In
VHF Connecting
Cable (not
supplied)
TV
(To View)
A/V Cable
(Supplied)
To Audio In
To Video In
Recording:
VCR (Rear)
To S-Video In
(If there is S-Video In)
• For technical reasons, dubbing a tape
may reduce its quality.
• Press DISPLAY on the Palmcorder
remote control (optional, page 64) to
eliminate EVF/LCD Monitor indications.
• If the Time Code is displayed in the EVF
or LCD monitor, it cannot be reset.
• Only the DATE/TIME, when displayed,
will be recorded on the tape.
CAUTION:
Unauthorized exchanging and/or copying of
copyrighted recordings may be copyright
infringement.
A/V OUT
S-VIDEO OUT
Source (Playing)
Palmcorder
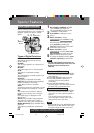
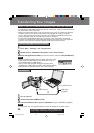
Copying your Tapes to
S-VHS or VHS Cassette
Monitor with your TV
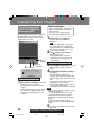
1Insert a pre-recorded tape
into the source (playing) Palmcorder
and a blank tape, with record tab in
place, into the target VCR (Recorder).
2Press PLAY on the Palmcorder. When
the tape reaches the point you want to
start dubbing, press PAUSE.
3Place the VCR into REC/PAUSE
mode. (See VCR manual.)
4Simultaneously, press PAUSE on
both units to begin copying.
5Press STOP on both units when
copying is completed.
S-Video
Cable (not
supplied)
Audio In
Note
• Turn the TV ON and select its VCR
channel (either CH3 or CH4).
• Set the VCR/TV Selector on the
recording VCR to VCR.
Before you begin
• Connect both Palmcorder and VCR to
their power sources.
• Connect the Palmcorder to a VCR as
illustrated left.
• Turn ON both units.
• Set the recording VCR’s Input Signal
Selector to LINE.
• Set the Palmcorder POWER Switch to
VCR.
Special Features
Special Features
201_401.49-52.p65 01/01/18, 17:0851