


Broadband Router User Guide
14
Note: This function is built-in to the LED indicators to add extra capabilities. The three
options allow the Administrator to configure and camouflage the illumination for the
LED indicator to falsify the monitoring status. In Normal Mode the LED indicator func-
tions as normally. Under Off Mode the LED indicators are both off however, it is still
monitoring the activity. In Dummy Mode the LED indicators operate in monitoring
condition but monitoring activity is off or on.
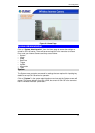
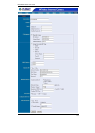
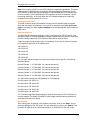
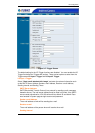
Loading ActiveX From:
This field is used to specify the location of Xplug Control (ActiveX) plug-in program.
Enter the information as required in .ocx format, for example: http://www.<your com-
pany>.com/xplug.ocx where <your company> must be replaced with your company’s
DNS name.
Open Second Port:
The Web Server field allows settings to open a second port for ICA-100 series. This
will permit users IP Sharing Gateways to support multiple Internet Cameras. By default
Port 80 is always opened for ICA-100 series Web Server access. Select
“Yes” and input the second port value. For example: If you have 5 Internet Cameras
to be installed, each with an IP address from
192.168.0.101
192.168.0.102
192.168.0.103
192.168.0.104
192.168.0.105
You can open the second port for each Internet Camera from port 81 to Port 85 as
illustrated below:
Internet Camera 1 – IP 192.168.0.101, second web port 81
Internet Camera 2 – IP 192.168.0.102, second web port 82
Internet Camera 3 – IP 192.168.0.103, second web port 83
Internet Camera 4 – IP 192.168.0.104, second web port 84
Internet Camera 5 – IP 192.168.0.105, second web port 85
You also need to setup your DSL gateway for Port Mapping.
Port 81 map to 192.168.0.101
Port 82 map to 192.168.0.102
Port 83 map to 192.168.0.103
Port 84 map to 192.168.0.104
Port 85 map to 192.168.0.105
The Transfer Image field allows settings to open a second port for ICA-100 series to
transfer images. The default Port 8481 is open image transfer and you can define a
second port similar to the above.
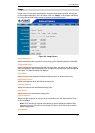
Save/Cancel:
After making sure all settings in the System are correct, click on the “Save” icon to
store the settings for ICA-100 series. You can alternatively click on the “Cancel” icon
to restore all settings to the values last saved to or retrieved from ICA-100 series.