


Repair Manual
Macro 5 SLR Camera
42
2. Reassembly
a. Connect the trigger cables (J31) to its applicable trigger PC boards.
Note: Make sure each cable is properly dressed and secured by the white
cable clamps attached to the side of the left/right cover.
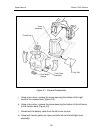
b. Using both hands, gently install the left/right cover assembly (includes the
front cover) onto the camera back making sure that it properly aligns with
each bottom screw hole and that it properly fits around the turret
assembly.
c. Connect the battery cable to its left cover tie post.
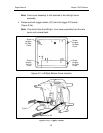
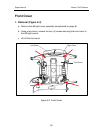
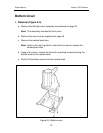
d. Using a torx driver, install and tighten the screw that secures the bottom of
the right cover to the camera back (Figure 5-2).
e. Using a torx driver, install and tighten the screw that secures the bottom of
the left cover to the camera back (Figure 5-2).
f. Install the film door button adapter. It should snap into place.
g. Using a torx driver, install and tighten the three (3) screws that secure the
right hand grip to the right cover.
Note: Be careful not to pinch the battery cable between the right hand
grip and its cover.
h. Using a torx driver, install and tighten the three (3) screws that secures the
left hand grip to the left cover.
Note: Be careful not to pinch the S1/S2 cable between the left hand grip
and its cover.
i. Using a torx driver, install and tighten the single screw that secures the
left/right covers to the top of the turret assembly.
j. Using a torx driver, install and tighten the single screw that secures the
turret knob to the top of the turret assembly.
k. Install a new adhesive vinyl pad (Part Number 1B6614A) to the bottom of
the camera back.
l. Connect the camera’s power source: Install the battery holder, snap
battery cable clip onto hjolder connection, slide battery cover closed.