


Installation and Connections
Installation
53
Note
For attaching the camera to the ceiling bracket, use
only the supplied screws. Using other screws may
damage the camera.
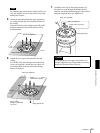
5
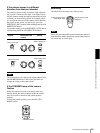
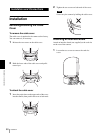
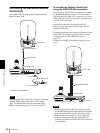
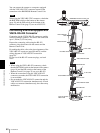
Attach the attachment materials (not supplied) to
the ceiling bracket (B), and install the bracket on
the ceiling.
Align the f hole on the ceiling bracket (B) in the
direction where the front of the camera will be
positioned later.
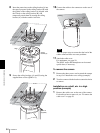
6
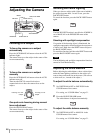
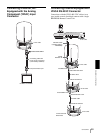
Attach the wire rope to the materials near the
ceiling.
Use an M5 (3/16 inch) hexagon socket head cap
screw (not supplied). Attach the wire rope to an
area independent of the area where the ceiling
bracket is attached.
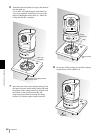
7
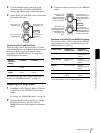
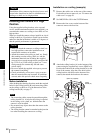
Attach the wire rope to the ceiling bracket (A).
Pass the wire rope through the fixing hole and
attach its end to the attachment hole on the bracket
using the supplied one screw (3M4 × 8).
Ceiling bracket (B)
f hole
Ceiling
Attachment materials
Ceiling bracket (B)
Ceiling
Attachment materials
M5 (3/16 inch)
hexagon socket head
cap screw
Wire rope (supplied)
For attaching the wire rope to the bracket, use
only the supplied screw. Using another screw may
disable the function of the wire rope.
3M4 × 8 (supplied)
Wire rope (supplied)
Ceiling bracket (A)
Fixing hole for wire rope
Caution