


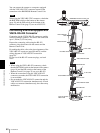
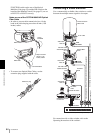
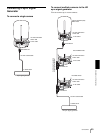
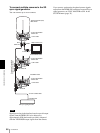

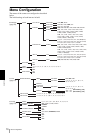


Appendix
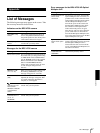
Troubleshooting
68
Troubleshooting
Before bringing in your camera for service, check the
following as a guide to troubleshoot the problem. If the
problem cannot be corrected, consult with your Sony
dealer.
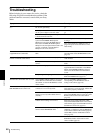
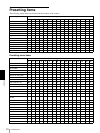
Symptom Cause Remedy
The power of the camera is not turned
on.
The AC power adaptor is not connected to the
DC IN 12V jack firmly.
Insert the power cord firmly as far as it will
go.
The AC power cord is not inserted firmly into
the AC power adaptor or the AC outlet.
Insert the power cord firmly as far as it will
go.
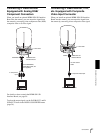
The BRBK-H700 HD Optical Multiplex Card
is inserted into the card slot.
Remove the card from the card slot.
When using the far distance remote control
system with the BRBK-H700 Optical
Multiplex Card, CCFC-M100HG Optical
Fiber Cable and BRU-H700 HD Optical
Multiplex Unit, the Optical Fiber Cable is not
properly connected or the HD Optical
Multiplex Unit is not turned on.
Insert the Optical Fiber Cable firmly as far as
it will go.
Turn on the HD Optical Multiplex Unit, or
plug in the power cord of the unit to an AC
outlet firmly.
The camera cannot be turned on with the
supplied Remote Commander.
IR-RECEIVE in the SYSTEM menu is set to
OFF.
Use the RM-BR300 Remote Control Unit to
open the menu and set IR-RECEIVE to ON.
(page 35)
The picture is not displayed on the video
monitor connected to the camera.
The video cable is not connected properly. Check the connection between the camera and
video monitor.
The exposure is not set correctly on the
camera.
Set the exposure correctly in the EXPOSURE
menu.
Pan, tilt or zoom cannot be operated. Any menu is displayed on the monitor screen. Press the DATA SCREEN button on the
supplied Remote Commander or the MENU
button on the RM-BR300 Remote Control
Unit to turn off the menu from the monitor
screen.
The panning or tilting range is limited. Change the PAN-TILT LIMIT setting in the
PAN TILT ZOOM menu (page 34).
The Remote Commander does not work. The CAMERA SELECT button you pressed
on the Remote Commander does not match
the number set with the IR SELECT switch
on the camera.
Press the CAMERA SELECT button
corresponding to the IR SELECT switch
setting on the camera (page 40).
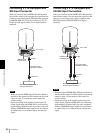
The camera cannot be operated with the
RM-BR300 Remote Control Unit.
The connection using the VISCA RS-422
connectors is not correctly made.
Check that the connection to the VISCA RS-
422 connectors is correctly made, and the RS-
422 cable is properly connected.
The BOTTOM switch on the bottom of the
camera is set to any other address than “0
(AUTO).”
Identify the address of the camera (page 19),
then set the MODE selector on the rear of the
Remote Control Unit to the same address
(page 23).
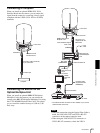
VISCA control setting is not correct. Select the proper setting (RS-232C or RS-
422) with the BOTTOM switch on the bottom
of the camera (page 19) and the DIP switch on
the Remote Control Unit (page 23).
The communication baud rate setting of the
camera and the RM-BR300 differ.
Select the same communication baud rate
(9600 bps or 38,400 bps) with the BOTTOM
switch on the bottom of the camera (page 19)
and the DIP switch on the Remote Control
Unit (page 23).
The NC (No Connection) switch is set to ON. Set camera address selector switch 4 of the
BOTTOM switches on the bottom of the
camera to OFF (page 19).