


Quick Start Guide
11
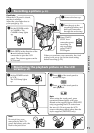
Recording a picture (p. 29)
Monitoring the playback picture on the LCD
screen (p. 42)
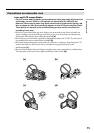
Note
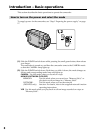
Do not pick up your
camcorder by the LCD
panel, the battery pack, the
flash or the jack cover.
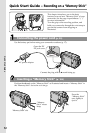
2Press of the touch panel to
rewind the tape.
3Press of the touch panel to
start playback.
Note
When using the touch panel, press
operation buttons lightly with your
thumb or the supplied stylus (DCR-IP55
only) supporting the LCD screen from
the rear of it. Do not press the LCD
screen with sharp objects other than the
stylus supplied (DCR-IP55 only).
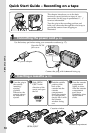
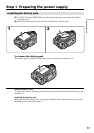
1Remove the lens cap.
4Slide OPEN in the direction of the
B mark indicated on the
camcorder to open the LCD
panel. The picture appears on the
LCD screen.
When you purchase your camcorder, the clock
setting is not set up yet. Set the clock setting
before recording (p. 22).
Viewfinder
When the LCD panel is closed,
use the viewfinder.
Adjust the viewfinder lens to
your eyesight (p. 33).
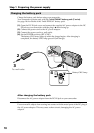
2Turn the grip to the
recording position, and
hold your camcorder
through the wrist strap.
3Set the POWER switch
to CAMERA. The
CAMERA lamp lights
up.
MEMORY/
NET-
WORK
CAMERA
(CHG)
POWER
OFF
ON
MODE
VCR
5Press START/
STOP. Your
camcorder starts
recording. To
stop recording,
press START/
STOP again.
START/STO
P
1Set the POWER switch
to VCR.
The VCR lamp lights
up.
MEMORY/
NET-
WORK
CAMERA
(CHG)
POWER
OFF
ON
MODE
VCR