


15
6. 5 Shading Correction
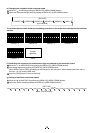
Due to the lens used or the environmental condition, color shading may occur at the upper and lower edge of the
screen. If this happens, the shading correction function can be used to decrease the amount of color shading. For
shading correction of the unit, SET (Automatic shading correction), MANUAL (Manual shading correction), and OFF
(no shading correction) modes are provided. Select the mode on the OPTION 1 menu. (Refer to the item “7.2 (8) (8.1)
Changing shading correction mode”.)
1
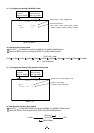
SET (Auto shading)
• If the color bar pattern is displayed on the screen or if the index menu/menu is displayed, press the [DISP] button
to remove them from the screen.
• Push the [MENU UP] button for approx. 1 second.
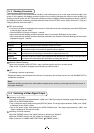
• When the automatic shading correction operation starts, the character SHD blinks on the screen.
• When the automatic shading correction operation terminates, the character SHD ends blinking and the result is
displayed for approx. 1 second.
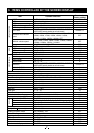
Display Meaning
SHD OK Automatic shading correction operation fi nished correctly.
SHD OK
LIMIT
Automatic shading correction operation fi nished, however, the correction necessary exceeds
the camera’s range so the maximum possible value is applied.
SHD NG
LEVEL LOW
Automatic shading correction cannot be performed because the video level is too low. Adjust
the video level by increasing the illumination or opening the lens iris.
SHD NG
LEVEL HIGH
Automatic shading correction cannot be performed because the video level is too high. Adjust
the video level by decreasing the illumination or closing the lens iris.
2
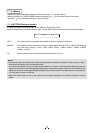
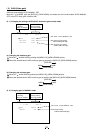
MANUAL (Manual Shading)
Perform the correction on the OPTION 1 menu, confi rming with a monitor or a vector scope.
(Refer to the “7.2 (8) (8.2) Changing manual shading correction mode”.)
3
OFF
No shading correction is performed.
* Shading correction is only effective when the lens iris and zoom ratio is fi xed. Use the unit with SHADING OFF for
variable lens conditions.
Note:
Implement shading correction after white balance adjustment by shooting a white object that fi lls the screen in
the proper video level.
6. 6 Switching of Video Signal Output
1
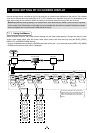
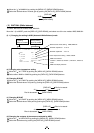
Switching of I/P modes
The image output can be changed between “1080p” and “1080i” by turning on the power supply while pushing the
[DATA UP] or [DATA DOWN] button.
• Turn on the power supply while pushing the [DATA UP] button. The image output becomes “1080p”, and “1080p”
is displayed on the monitor screen.
• Turn on the power supply while pushing the [DATA DOWN] button. The image output becomes “1080i”, and
“1080i” is displayed on the monitor screen.
2
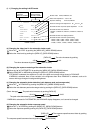
Switching of vertical frequency
Adjust the FORMAT switch to the “59.94” position for switching to “59.94Hz”.
Adjust the FORMAT switch to the “50” position for switching to “50Hz”.
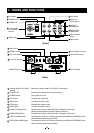
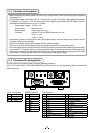
(Refer to the item “4. NAMES AND FUNCTIONS,
18
FORMAT switch”.)