


AXIS 211M - Audio Settings
17
Audio Settings
The AXIS 211M can transmit audio to other clients using a connected external microphone or the internal
microphone and can play audio received from other clients via connected speakers. This section describes how
to configure the basic audio settings for the AXIS 211M, e.g. set the communication mode and adjust the sound
levels in the microphone and speakers connected to the camera.
Note: The speakers connected to the audio output must have a built-in amplifier, e.g.
PC speakers.
Enable Audio
Check this box to enable audio in the AXIS 211M.
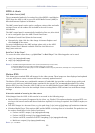
Audio Channels - Audio mode
Full duplex mode is simultaneous two-way audio where you can
transmit and receive audio at the same time.
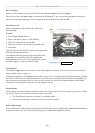
Half duplex mode transmits and receives audio in both directions,
but only in one direction at a time. This means that you must select
when to receive or transmit audio with the push-to-talk button. To
speak, press and hold the button (check that the microphone is not muted). When finished speaking, release the
button and you will receive audio from the other end of the connection.
Note that the push-to-talk button is configured from AMC. It is also possible to configure the push-to-talk
button so that it toggles between speaking and listening modes.
When selecting Simplex - Network Camera speaker only mode, the speaker connected to the camera will play
audio, but no audio will be transmitted from the camera to other web clients. This could be used to e.g. provide
spoken instructions to a person seen in the camera. This mode requires you to use the push-to-talk button.
Simplex - Network Camera microphone only mode transmits audio only from the AXIS 211M to web clients. It
will not receive audio from any other web clients. This can be used in remote monitoring, web attractions etc.,
to provide live audio, as well as video, of a monitored situation.
When using half duplex, the Send the sound from the active client to all other clients option transmits the
audio signal from the client that is talking to all the other clients.
Audio Input
Audio from a connected microphone or a line source can be connected to the Audio in connector of the AXIS
211M. The audio source must be set to Microphone or Line depending on the connected device.
Note: To prevent unauthorized listening, the internal microphone can be disabled by inserting a plug in the Audio in connector.
The Enable microphone power option provides DC power for an external microphone. If using a small electret
microphone such as a clip-on mic or a PC microphone, this option needs to be enabled.
Note: To use a high impedance dynamic microphone, DC power should not be enabled. DC power will not harm the microphone, but if you are
uncertain, try switching it off and on. The default value is DC power enabled. To use a professional microphone requiring 48V phantom
power, you need an external power supply and must use a balanced-unbalanced converter (audio transformer) in between.
Set Input sensitivity to High or Low depending on the sound level in the monitored are. For example, if the
AXIS 211M is installed in a noisy environment set the sensitivity to Low. When using an external microphone
set the Input sensitivity to High if you are using an ordinary, unamplified microphone. Set the sensitivity to
Low if the connected microphone has a built-in line amplifier.
Enable microphone power with electret microphones that have no battery. Do not use this setting with a
dynamic or battery powered microphone.
Select the desired audio Encoding format G711, G726 or AAC.
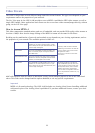
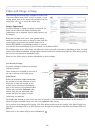
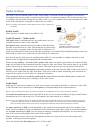
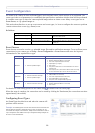
Client PC
TCP/IP Network
Example of a network
using AXIS 211M cameras to transmit
audio and video across the network.