


AXIS 211M - System Options
32
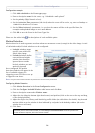
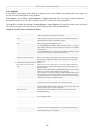
Maintenance
•Restart - The camera is restarted without changing any of the settings.
•Restore - The unit is restarted and most current settings are reset to factory default values. The settings that
will not be reset are as follows:
• the boot protocol (DHCP or static)
• the static IP address
• the default router
•the subnet mask
•Default - The default button should be used with caution. Pressing this will return all of the camera's settings
to the factory default values (including the IP address).
Upgrade Server - See Upgrading the Firmware, on page 35.
Backup - To take a backup of all of the parameters, and any user-defined scripts, click this button. If necessary,
it will then be possible to return to the previous settings, if settings are changed and there is unexpected
behavior.
Restore - click the Browse button to locate the saved backup file (see above) and then click the Restore button.
The settings will be restored to the previous configuration.
Note: Backup and Restore can only be used on the same unit running the same firmware. This feature is not intended for the configuration
of multiple units or for firmware upgrades.
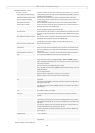
Support
The Support overview page provides valuable information on troubleshooting and contact information, should
you require technical assistance.
System Overview - is a quick look at the camera’s status and settings. Information that can be found here
includes the camera’s Firmware version, IP address, Security, Optional Network Services, Event Settings, Image
settings and Recent log items. Many of the captions are also links to the proper Setup page to conveniently
make adjustments in the camera’s settings.
Logs & Reports - when contacting Axis support, please be sure to provide a valid Server Report with your
query.
Information
Logs, Server Report and Parameter List all provide valuable information for troubleshooting and when
contacting Axis support.
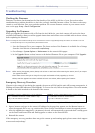
Configuration
Log Level for Log Files - from the drop-down list, select the level of information to be added to the Log file
Log Level for Email - from the drop-down list, select the level of information to send as email and enter the
destination email address.