


152
Before connecting the camera to the personal computer, be sure
to first install the EOS DIGITAL Solution Disk software (in the
CD-ROM provided with the camera) in the personal computer.
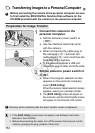
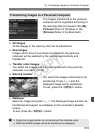
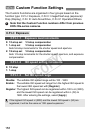
1
Connect the camera to the
personal computer.
Set the camera’s power switch to
<2>.
Use the interface cable that came
with the camera.
When connecting the cable plug to
the camera’s <D> terminal, the
cable plug’s <D> icon must face the
front side of the camera.
To the personal computer’s USB port,
connect the plug on other end of the cable.
2
Set the camera’s power switch to
<1>.
When the program selection screen
appears on the personal computer,
select [EOS Utility].
When the camera model selection screen
appears, select your camera’s model.
X
The [
EOS Utility
] screen will appear on
the computer, and the direct transfer screen
will appear on the camera’s LCD monitor.
d
Transferring Images to a Personal Computer
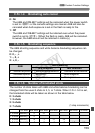
Preparation for Image Transfer
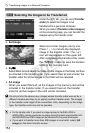
Shooting will be disabled while the direct transfer screen is displayed.
If the [EOS Utility] screen does not appear, see Software Instruction
Manual in the CD-ROM.
Before disconnecting the cable, turn off the camera first and pull out the
cable by grasping the plug (instead of the cord).
COPY