


Chapter 2: Preparing to Take Pictures 12 Using the Image LCD
Using the Image LCD
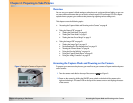
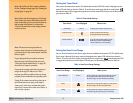
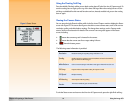
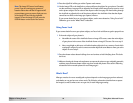
Figure 4: Image LCD Screen in Live View Turn the image LCD on by pressing the DISPLAY button on the back of the camera. You now see the
live view of Capture mode on the image LCD. Live view lets you preview the pictures you can take
with the camera, as well as view and change some of the camera’s settings.
The image LCD screen in the live view of Capture mode includes two opaque overlay bars and an
image area in the center for viewing your picture subjects (see Figure 4). The top overlay bar displays
status information about the camera while you are taking pictures. The bottom overlay bar contains
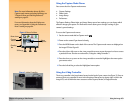
labels that describe the function of the soft keys immediately below them. For example, if you press
the right (Status) soft key in Capture mode, the Status screen displays. To turn the overlay bars off or
on, press the middle (Overlay) soft key.
You can also use the image LCD to access menus to change camera settings in the Capture,
Playback, and Review modes, and to play back and review captured images in the Playback and
Review modes, respectively. The image LCD is disabled in PC Connect mode.
Note: By default, the image LCD is turned off
when you power on the camera in Capture
mode. If you want the image LCD to always turn
on instead, you can change the setting in the
Display submenu of the Preferences menu. (See
“Display Submenu” on page 67 and “Setting
the Display” on page 95.)
However, note that the image LCD uses a lot of
battery power. If you are running your camera
on batteries rather than with the HP-approved
AC power adapter, you may want to limit your
use of the image LCD.
The following subsections provide more information about the overlay bars and the soft keys in the
live view of Capture mode.
Understanding the Text Message Area
The text message area is a one-line text area in the middle of the top overlay bar. An example text
message is: “Battery Low.” The following indicators will also appear in the text message area when
you change certain settings in the Capture mode menus. For information on using the Capture mode
menus to change camera settings, see “Using the Capture Mode Menus” on page 15.
Exposure Mode Indicator
When you set the Exposure Mode in the Photo Assist menu to either Landscape Program, Portrait
Program, or Action Program, the current Exposure Mode is displayed in the text message area.
Note: For information on setting the Exposure
Mode, see “Exposure Mode Submenu” on
page 56.
Aperture Value and Shutter Speed Indicators
When you set the Exposure Mode in the Photo Assist menu to Aperture Priority (Av) or Shutter
Priority (Tv), the current aperture value and shutter speed are displayed in the text message area (for
example: Tv 1/125 F5.6). The aperture value and shutter speed will update automatically and change
continually as the camera zooms and measures the exposure. When the camera cannot set the
correct exposure because you have selected an aperture or shutter speed that is too big or small, the
line in the text message area will turn red.
Manual Focus Distance
Note: For information on setting the Focus
Mode, see “Focus Mode Submenu” on page 59.
When you set the Focus Mode in the Photo Assist menu to Manual Focus, the focus distance appears
on the left side of the text message area.
Soft keys
Top
overlay bar
shows status
Bottom
overlay bar
shows soft key
labels