


Card
Cannot insert the SD card.
Make sure not to insert the SD card in the wrong direction.
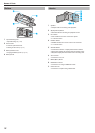
“Inserting an SD Card” (A p. 14)
Unable to copy to SD card.
To use SD cards that have been used on other devices, it is necessary to
format (initialize) the SD card using “FORMAT SD CARD” from media
settings.
“FORMAT SD CARD” (A p. 71
)
Playback
Sound or video is interrupted.
Sometimes playback is interrupted at the connecting section between two
scenes. This is not a malfunction.
There is no sound.
Audio sound is not recorded for videos taken in “TIME-LAPSE
RECORDING”.
“Recording at Intervals (TIME-LAPSE RECORDING)” (A p. 31)
The same image is displayed for a long time.
Replace the SD card. (When the SD card is damaged, difficulty in reading
the
data occurs. This unit will try to play back as much as possible, but it will
stop eventually if the condition persists.)
Execute “FORMAT SD CARD” in the “MEDIA SETTINGS” menu. (All data
will be deleted.)
“FORMAT SD CARD” (A p. 71)
The motion is choppy.
Replace the SD card. (When the SD card is damaged, difficulty in reading
the
data occurs. This unit will try to play back as much as possible, but it will
stop eventually if the condition persists.)
Execute “FORMAT SD CARD” in the “MEDIA SETTINGS” menu. (All data
will be deleted.)
“FORMAT SD CARD” (A p. 71)
Verify the system requirements of your PC when using Everio MediaBrowser
4 to play back.
“Verifying System Requirements (Guideline)” (A p. 46)
Cannot find a recorded file.
Cancel the date search function.
“Searching for a Specific Video” (A p. 36)
Select “PLAYBACK OTHER FILE” in the menu. (Video files that have
damaged management information can be played back.)
“Playing a Video with Defective Management Information” (A p. 36)
No date/time display.
Set “ON-SCREEN DISPLAY” in the menu accordingly.
“ON-SCREEN DISPLAY” (A p. 63)
Set “DISPLAY ON TV” in the menu to “ON”.
“DISPLAY ON TV” (A p. 69)
Images do not appear on the TV properly.
Disconnect the cable and connect again.
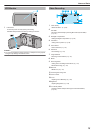
“Connecting via the HDMI Mini Connector” (A p. 38)
Turn off and on this unit again.
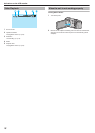
Images are projected vertically on the TV.
Set “VIDEO OUTPUT” in the “CONNECTION SETTINGS” menu to “4:3”.
“VIDEO OUTPUT” (A p. 69
)
Adjust the TV's screen accordingly.
The image displayed on TV is too small.
Set “VIDEO OUTPUT” in the “CONNECTION SETTINGS” menu to “16:9”.
“VIDEO OUTPUT” (A p. 69)
When connected to the TV via the HDMI mini cable, proper
images and sounds are not output.
Images and sounds may not be output properly depending on the TV
connected. In such cases, perform the following operations.
A
Disconnect the HDMI mini cable and connect it again.
B Turn off and on this unit again.
“Connecting via the HDMI Mini Connector” (A p. 38)
Troubleshooting
78