


43
Shooting
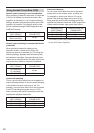
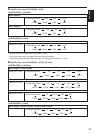
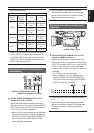
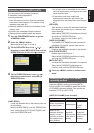
• Audio input switching
Switch setting Recording channel
AUDIO CH1
SELECT
switch
AUDIO CH2
SELECT
switch
CH1 CH2
INT(L)
INT(R)
Built-in
microphone
Lch
Built-in
microphone
Rch
INPUT2
Built-in
microphone
Lch
INPUT2
INPUT1
INT(R) INPUT1
Built-in
microphone
Rch
INPUT2 INPUT1 INPUT2
INPUT2
INT(R) INPUT2
Built-in
microphone
Rch
INPUT2 INPUT2 INPUT2
• When inputting an external microphone signal
to CH1 and CH2, connect the microphone to
the AUDIO INPUT2 terminal, and set both the
AUDIO CH1 SELECT switch and AUDIO CH2
SELECT switch to INPUT2.
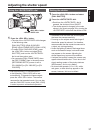
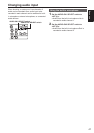
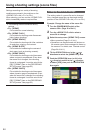
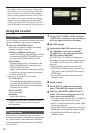
Adjusting the audio recording level
automatically
AUDIO AUTO/MANU CH1 switch
AUDIO AUTO/MANU CH2 switch
1
Set the AUDIO AUTO/MANU CH1 or CH2
switch to <AUTO> position.
Adjust the audio signal recording level input
through the built-in microphone and the AUDIO
INPUT1/2 terminals (XLR 3-pin) automatically.
•
CH1/CH2 can be set separately.
•
When <AUTO> is set, the recording level adjustment
using the <AUDIO LEVEL> knob and the setting in
the [AUDIO LIMITER CH1]/[AUDIO LIMITER CH2]
item of the setup menu [RECORDING SETUP]
screen (Page 90) are disabled.
• Since the audio signal recording level is
adjusted automatically, the zoom operation
sound may be recorded if zooming quickly,
depending on the environment.
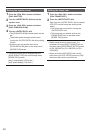
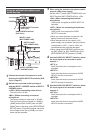
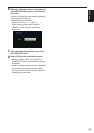
Adjusting the audio recording level
manually
<AUDIO LEVEL> knob
1
Set the AUDIO AUTO/MANU CH1 or CH2
switch to <MANU> position.
Adjust the audio signal recording level input
through the built-in microphone and the AUDIO
INPUT1/2 terminals (XLR 3-pin) using <AUDIO
LEVEL> knob. Check the audio level meter
display on the bottom left of the LCD monitor or
viewnder.
•
CH1/CH2 can be set separately.
•
When <MANU> is set, the setting in the
[AUDIO LIMITER CH1]/[AUDIO LIMITER
CH2] item of the setup menu [RECORDING
SETUP] (Page 90) is enabled.
• Before shooting, check the recording volume
level.
• When recording, the recording level of this
camera is set approximately 8 dB higher than
Panasonic shoulder camera-recorders for
broadcast.