


INSTALLATION AND SYSTEM SET UP
Set Up: Free-Run Mode
18 SuperView 3000 User Manual May 9, 2002
4
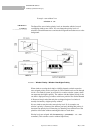
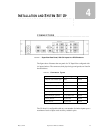
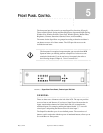
FRONT PANEL ADJUSTMENT
To adjust the host timing from the front panel, follow the steps below.
Step 1 - Verify connections To perform the interactive timing adjustment,
make sure the host computer is switched on and connected at the SuperView’s
B
ACKGROUND INPUT.
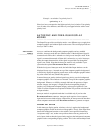
Step 2 - Begin Interactive Timing Adjust (ITA) Press the O
UTPUT button
and navigate through the menu to the Output Timing Adjust option. Press
E
NTER to begin the adjustment process—a white box and cross hair appear on
your output display.
Step 3 - First adjustment Use the four directional arrow buttons to position
the top left corner of the box at the top left corner of the display monitor. Press
E
NTER to save changes and move to the second part of ITA.
Step 4 - Second adjustment Use the four directional arrow buttons to
position the botton right corner of the box at the bottom right corner of the
display monitor. Press E
NTER to save changes.
Step 5 - Repeat adjustment procedure Perform the adjustment procedure for
each corner twice. This repetition is necessary to accurately fine-tune the timing
parameters.
Saving adjustment Once you have adjusted your host, you should save it to
the host list. The next time you use the same host, the SuperView will recall
your saved settings and use them for the output timing. To save a host, navigate
through the Output menu until you see the menu called Save Host. You can
press E
NTER to save the host to one of the ten user-definable entries on the host
list. Note that from the front panel, the default host name will be used.
Once you have completed the ITA procedure, finish the set up of your unit by
addressing the different window image controls available from the front panel
or through serial control. For front panel control, refer to Chapter 5 and for
serial control, refer to the Command Set in Chapter 6.
................................................
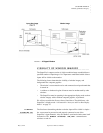
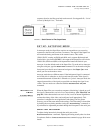
SET UP: FREE-RUN MODE
In Free-run mode, the SuperView generates sync internally. Only window input
sources are connected; there is no source at the B
ACKGROUND INPUT connector.
To set up a SuperView for Free-run operation, you can follow the same steps
outlined above for the AutoSync mode. The only difference being that you do
not need to have a host computer connected to the B
ACKGROUND INPUT
connector.
Note that Free-run mode is the factory default mode of the SuperView.