


10
Installation
4 Adjust the length by pulling down the end of the belt.
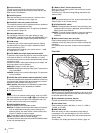
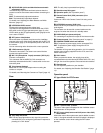
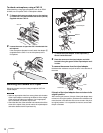
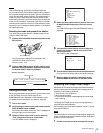
Attaching a Lens
For information on handling lenses, refer to the operation
manual for the particular lens
1 Push the lens fixing lever A upward and remove the
lens mount cap from the lens mount.
2 Align the lens’ alignment pin C with the notch B in
the upper part of the lens mount and insert the lens
into the mount.
3 While supporting the lens, push the lens fixing lever
A downward to secure the lens.
4 Connect the lens cable to the LENS connector.
5 Secure the lens cable with the cable clamp.
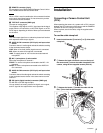
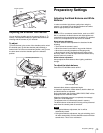
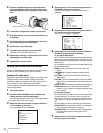
Attaching a Viewfinder
When the viewfinder is attached, do not leave the camera with
the eyepiece facing the sun. Direct sunlight can enter through
the eyepiece, be focused in the viewfinder and cause fire.
Example: Attaching an HDVF-200 Viewfinder
For details on the viewfinder, refer to the operation manual for
the viewfinder.
1 Loosen the viewfinder left-right positioning ring and
slide the viewfinder in the direction of arrow A.
The viewfinder stopper B automatically pops down.
2 Tighten the viewfinder left-right positioning ring to
secure the viewfinder at the most convenient
position.
3 Connect the viewfinder cable to the VF connector.
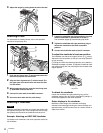
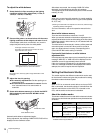
To adjust the viewfinder’s front-rear position
The viewfinder can slide in the range of 53 mm (2
1
/
8
inches).
Adjust the front-rear position so that you can easily operate it
on your shoulder.
1 Pulling the LOCK lever backward permits you to slide the
viewfinder backward or forward. 2 Adjust the viewfinder front-
rear position and 3 lock it by returning the lever forward to the
original position.
To detach the viewfinder
Loosen the viewfinder left-right positioning ring, pull the
viewfinder stopper, then pull out the viewfinder by sliding it in
the direction opposite to that when attached.
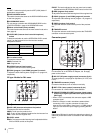
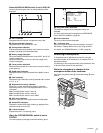
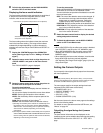
Status displays in the viewfinder
Besides the video image, the viewfinder can display
characters and messages showing the camera settings and
operation status, as well as items such as a center marker or
safety-zone marker.
Caution
O
F
F
O
N
S
E
L
W
H
T
B
L
K
S
H
U
T
T
E
R
R
E
T
L
E
N
S
I
N
E
T
E
R
C
O
M
L
E
V
E
L
M
I
C
V
F
4
1
2
3
C
A
B
5
R
E
T
1
INC
O
M
VF
A
B
1
2
3
1
2
3
L
O
C
K
LOCK lever