


15
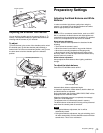
Preparatory Settings
With artificial lighting, particularly fluorescent lights and
mercury vapor lamps, the brightness appears to be constant,
but in fact the strength of the red, green, and blue components
varies with the power supply frequency. This phenomenon is
known as “flicker.” When using the electronic shutter under
these lighting conditions, there are certain cases in which the
flicker is more noticeable. In particular, color flicker is evident
when the power frequency is 60 Hz. In areas where the power
frequency is 50 Hz, setting the shutter speed to 1/100 second
will reduce the flicker.
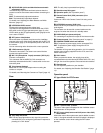
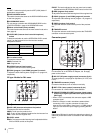
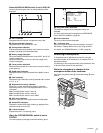
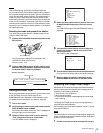
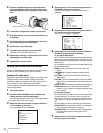
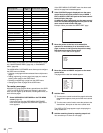
Selecting the mode and speed of the shutter
The mode and the shutter speed in Standard mode are set
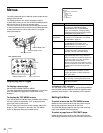
using the SHUTTER switch.
1 Push the SHUTTER switch from the ON position to the
SEL position.
The current shutter setting will be displayed in the
viewfinder for about three seconds.
Example: “Shutter: 1/250”
2 Push the SHUTTER switch to the SEL position again
before the display disappears. Repeat this action until
the desired mode or speed is displayed.
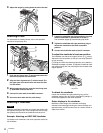
Setting the Local Time
When using the camera for the first time, set the built-in clock
to the local time, using the <DATE> page of the
MAINTENANCE menu displayed on the viewfinder screen.
For details on menu operations, see “Menus” (page 20).
1 Turn on the camera.
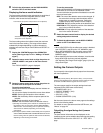
2 While holding the menu control knob pressed, set the
DISPLAY/MENU switch to MENU.
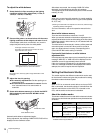
The camera enters Menu mode, and “TOP” is displayed at
the upper-right corner of the screen.
3 Rotate the menu control knob to set the cursor to
“TOP” and push on the menu control knob.
The TOP MENU screen is displayed.
4 Rotate the menu control knob to position the cursor
to MAINTENANCE and push on the menu control
knob.
The CONTENTS page of the MAINTENANCE menu is
displayed.
5 Turn the menu control knob to scroll the page and
position the pointer to <DATE> then push on the
menu control knob.
The <DATE> page is displayed.
6 Turn the menu control knob and set the date and time.
Push on the menu control knob to shift to the next digit.
7 When the date/time setting is completed, set the
DISPLAY/MENU switch to OFF to exit Menu mode.
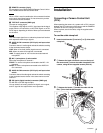
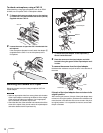
Adjusting the Flange Focal Length
Adjustment of the flange focal length (the distance between
the lens mount attachment plane and the imaging plane) is
necessary in the following situations:
• The first time a lens is attached
• When changing lenses
• If the focus is not sharp at both telephoto and wide angle
when zooming
The flange focal length can be more precisely adjusted by
using the focus assist indicators.
See “Displaying the focus assist indicators” (page 17) for the
focus assist indicators.
The various parts of the lens used in adjusting the flange focal
length are in different positions on different lenses. Refer to the
operation manual for the lens.
1 Set the iris control to manual and open the iris fully.
Note
O
F
F
O
N
S
E
L
W
H
T
B
L
K
SHUTTER
RET
LENS
INTERCOM LEVEL
SHUTTER switch
1/100
1/2000
1/1000
1/5001/2501/125
Example: with 59.94i
Standard mode
ECS mode
Note
<TOP MENU>
USER
USER MENU CUSTOMIZE
ALL
OPERATION
PAINT
MAINTENANCE
FILE
DIAGNOSIS
CONTENTS M00 TOP
01.<AUTO SETUP>
02.<WHITE SHADING>
03.<BLACK SHADING>
04.<OHB MATRIX>
05.<AUTO IRIS>
06.<MIC GAIN>
07.<CALL/TALLY>
08.<OUTPUT FORMAT>
09.<DOWN CONVERTER>
10.<TEST OUT>
<DATE> M15 TOP
DATE/TIME
2008/12/23 08:32