


19
Basic Procedure for Shooting
Basic Procedure for
Shooting
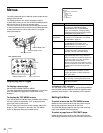
When an HXCU-100 Camera Control Unit or an external
control device, such as an RCP-series Remote Control Panel,
is connected, the white balance, black balance and shutter
adjustments are controlled from the external device, and the
controls on the camera are disabled.
For operations on the external control device, refer to the
operation manual for the device.
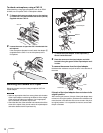
1 Turn the camera on.
To operate the camera on power supplied through the DC
IN connector of the camera via an AC power adaptor, set
the CAMERA POWER switch to EXT.
To operate the camera on power via the connected
HXCU-100, set the CAMERA POWER switch to CCU.
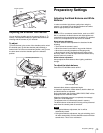
2 Set the filter select knob and 5600K appropriately for
the lighting conditions.
Filter select knob setting
1) Depth of field: This is the range over which the subject is
sharply in focus.
From the viewpoint of the characteristics of lenses,
shooting with the iris set in the range of F4 to F8 is
generally recommended for good quality pictures. Set the
filter select knob to bring the iris setting into that range.
However, this may not apply when special composition is
desired.
5600K setting
The 5600K ON/OFF function has been assigned to
assignable button 1 (front right, upper) at the factory.
3 Check the settings of the camera.
• Settings of switches/control knobs
• Settings on the OPERATION menu (page 24) and the
PAINT menu (page 28)
• Electronic shutter setting (page 14)
• Settings for the output signals from the camera (page
17)
• Flange focal length setting (page 15)
4 Adjust the eyepiece focus as well as the contrast and
brightness of the viewfinder image.
For viewfinder settings, refer to the operation manual for
the viewfinder.
5 If required, switch on the center marker and/or safety
zone and zebra pattern in the viewfinder image, using
the OPERATION menu.
6 Check the sound system settings.
• Microphone connections
• Settings of the AUDIO IN switches
• Settings on the VTR (Refer to the operation manual for
the VTR.)
7 Adjust the white balance and black balance (page 13).
8 Turn the focusing ring so that the subject is sharply in
focus.
9 Set up the VTR according to your shooting objectives
then start recording, using the button on the VTR.
For details on VTR setup and operations, refer to the
operation manual for your VTR.
10When shooting is finished, stop recording, using the
button on the VTR.
Note
Filter select knob Lighting conditions
1 (CLEAR) Indoor shooting
2 (1/4 ND) Outdoor (cloudy or rainy) or indoor
shooting when you wish to reduce the
depth of field
1)
3 (1/16 ND) Outdoor shooting in daytime
4 (1/64ND) Outdoor shooting when you wish to
reduce the depth of field, or especially
under bright outdoor ambient light
5600K Example of lighting conditions
OFF Indoor shooting under lighting with lower color
temperature, such as a halogen or tungsten lamp
ON Outdoor shooting in daytime, or indoor shooting
under lighting with higher color temperature