


Setting System Options User Guide
53
Manage Disk Usage
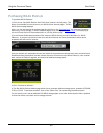
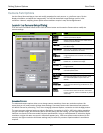
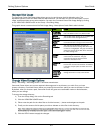
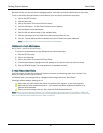
The Command Center Disk Usage dialog allows you to view and change the disk allocation rules. The
adjustable options include the Video Path and Max Allocation. You can also view the free disk space, current
usage, and discard date among other statistics. You open the Command Center Disk Usage dialog by clicking
on the
VIEW DISK USAGE button on the Setup > Recording dialog.
This graphic shows a screen shot of the Disk Usage dialog. A description of each field is also included:
Dialog Item Usage
Video Path
(adjustable)
The path where Command Center stores video
files. The default value is C:\WiLife Video.
Browse
Button (…)
The browse button allows you to navigate and
pick another video storage directory.
Free Disk
Space
The amount of free space on the drive
Command Center is using to store video files.
Max
Allocation
The max amount of space you allow to
Command Center for storing video files. The
number is in megabytes. The gray calculations
shows the percent of the disk drive allocated
for video storage use.
Current
Usage
Current usage shows the megabytes in
current use for video files. The gray
calculation shows the percent of the
maximum allocated in use.
Discarding
From
Discarding From shows the date of the oldest
file and the one Command Center will delete if
it needs to recycle space to make room for a
new clip.
Command
Center Disk
Usage Per
Camera
Here you can review a detailed list of the
storage and files in use by each camera.
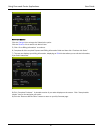
Change Video Storage Options
Setup > Recording > Recording section > VIEW DISK USAGE button.
Command Center allows you to store captured video segments in any directory you wish. Once you have
chosen a directory, Command Center allows you to specify the maximum space you want to allocate for video.
By default, when you choose a path, Command Center will guess at a reasonable maximum disk allocation,
which you can change.
To change the storage directory,
1) From the Setup dialog, click on the Recording tab.
2) Click the
VIEW DISK USAGE button.
3) Either enter the path for the video files or click the browse (…) button and navigate to the path.
4) Finally, set the amount of disk space you wish to allocate to video files in this directory.
Note: If you reduce the amount of disk space allocated to video files to a number less than that currently in use,
Command Center will slowly reduce the space used as new recordings are created.
5) Click the APPLY button to apply the changes.