Where To Go Next
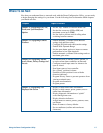
Now that you understand how to start and work with the Dome Configuration Utility, you are ready
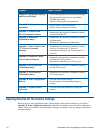
to begin changing the settings for your dome. Use the following chart to determine which chapters
you should use next.
Chapter Topics Covered
Chapter 2: Configuring Pan, Tilt,
Zoom, and Synchronization
Options
− Set the “flip” feature to rotate the dome 180°
− Set the first zoom stop (23X or 35X) and
maximum zoom (up to 230X)
− Set line lock to prevent vertical rolling when
switching between cameras
Chapter 3: Configuring Camera
Features
− Enable automatic or manual White Balance
settings (red and blue values)
− Configure IR (black-and-white) mode settings
− Enable Wide Dynamic Range
− Set the open shutter options to improve camera
performance in low light situations
− Enable automatic or manual Gain settings and set
maximum gain values
Chapter 4: Configuring Alarms,
Areas, Home, Privacy Settings and
Presets
− Set alarm actions to initiate a preset, pattern, or
no action when alarm conditions are detected
− Configure normal input states for alarms to be
open or closed
− Send input states to host controller
− Set a “home” position for dome
− Establish a North position for use with the
direction indicators
− Program Privacy Zones to prevent operators from
viewing restricted areas
− Program area boundaries
− Program presets
Chapter 5: Configuring Text
Displayed On-Screen
− Display or hide dome status information
− Display or hide camera, preset, pattern, area or
alarm name information
− Display diagnostic information or “splash”
screen during dome reset
− Display direction indicators
− Assign names to camera, presets, patterns, areas,
and alarms
− Reset all names to factory defaults
− Set text attributes (outline and translucent
characters)
Using the Dome Configuration Utility 1–7


