


38
AXIS 233D - Event Config
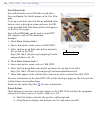
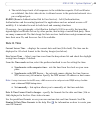
6. Set the When Triggered... parameters, that is, what the Network Dome Camera is to
do if the main door is opened - such as upload images to an FTP server.
7. Click OK to save the event in the Event Types list.
Please use the online help files for descriptions of each option.
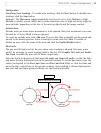
Pre-trigger and Post-trigger buffers
This function is useful when checking to see what happened immediately before and after
a trigger, for example, two minutes before and after a door has been opened.
Go to Event Types > Add Triggered... >
When Triggered... and check the Upload
images checkbox to view the available
options.
Include pre-trigger buffer - Images
stored internally in the server from the
time immediately preceding the trigger.
Check the box to enable the pre-trigger
buffer, enter the desired length of time
and specify the required image frequency.
Include post-trigger buffer - Contains
images from the time immediately after
the trigger. The post-trigger buffer is
configured in the same way as the
pre-trigger buffer.
Notes: • If the pre- or post-buffer is too large for the internal memory, buffering is disabled and an error is written
to the unit’s log file.
• Pre-trigger and post-trigger buffers will be lost if the connection to the event server fails.
Continue image upload (unbuffered) - Enable the upload of images for a fixed length of
time. Specify the length of time for the uploaded recording, in seconds, minutes or hours,
or for as long as the trigger is active. Finally, set the desired image frequency to the
maximum or to a specified frame rate. The frame rate is the best possible, but might not be
as high as specified, especially if uploading via a slow connection.
Create Folder - Images uploaded to FTP and HTTP servers can be saved to designated
folders. Folders can for example be named using the current date and time, please refer to
the online help files
for more information.
Base file name - Used to name all uploaded images. Add a suffix or use your own file
format to give the images unique names. Please refer to the online help files
for more
information.