


2-9
Cisco Video Surveillance 2500 Series IP Camera User Guide
OL-19273-02
Chapter 2 Getting Started
Resetting the IP Camera
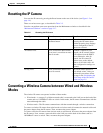
Resetting the IP Camera
You reset the IP camera by pressing the Reset button on the rear of the device (see Figure 1-2 on
page 1-4).
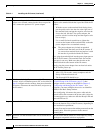
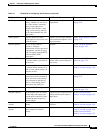
There are various reset types, as described in Table 2-2.
You also can perform some reset operations from the Maintenance window as described in the
“Maintenance Window” section on page 3-17.
Converting a Wireless Camera between Wired and Wireless
Modes
The wireless IP camera can operate in either of these modes:
• Wired mode—A category 5 or higher network cable is connected to the LAN port on the back of the
camera and to a 10/100BaseT router or switch. In this mode, the IP camera communicates with the
network through the cable.
• Wireless mode—The IP camera communicates with the network through a wireless connection.
To convert a wireless IP camera from wired mode to wireless mode, disconnect the network cable and
the power adapter from the IP camera. Then, reconnect the power adapter.
To convert a wireless IP camera from wireless mode to wired mode, disconnect the power adapter from
the IP camera. Next, connect a network cable to the LAN port on the back of the camera and to a
10/100BaseT router or switch. Then, reconnect the power adapter.
Ta b l e 2-2 Resetting the IP Camera
Reset Type Procedure Remarks
Reboot. Press and immediately release
the Reset button.
This action is equivalent to
powering the IP camera down
and then powering it up. Settings
that are configured for the IP
camera are retained.
IP address reset. Press and hold the Reset button
for at least 1 second but no more
than 9 seconds.
If DHCP is enabled in your
network, the IP camera obtains
an IP address from the DHCP
server. Otherwise, after 90
seconds, the IP camera IP
address resets to the default
address of 192.168.0.100. All
other configuration settings are
retained.
Factory reset. Press and hold the button for at
least 10 seconds.
Sets all IP camera options to
their default values. After you
perform this procedure, follow
the steps in the
“Performing the
Initial Setup of the IP Camera”
section on page 2-5.