


3-18
Cisco Video Surveillance 2500 Series IP Camera User Guide
OL-19273-02
Chapter 3 Configuring and Managing the IP Camera
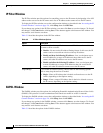
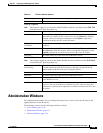
Administration Windows
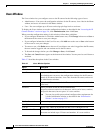
Ta b l e 3-8 Maintenance Window Options
Option Description
Restore Factory
Defaults
Click the Restore button to restore all IP camera settings to their factory
default values.
To confirm the restore procedure, click OK in the confirmation pop-up
window. Otherwise, click Cancel.
This action has the same effect as pressing and holding the Reset button on
the IP camera for at least 10 seconds. After you perform this procedure,
follow the steps in the
“Performing the Initial Setup of the IP Camera”
section on page 2-5.
Restart Click the Restart button to reboot the software on IP camera.
To confirm the restart procedure, click OK in the confirmation pop-up
window. Otherwise, click Cancel.
This action has the same effect as pressing and immediately releasing the
Reset button on the IP camera, or powering the IP camera down and then
powering it up.
Configuration Click the Save button to save the current IP camera configuration
information to a binary file.
When you click this button, the File Download window appears. Use this
window to save the configuration file. This file must include the
extension
.cfg.
You can then upload this configuration information to any IP camera in the
network. This feature is useful for creating a backup of this configuration
and for configuring other IP cameras based on this configuration.
Upload Path and folder where a configuration file is stored. You can click Browse to
find this location. After you enter this information, click Upload and follow
the on-screen prompts to load the configuration file to the IP camera.
After you upload a configuration file to the IP camera, the IP camera restarts
automatically.
If you upload configuration from another IP camera that is active in your
network, make sure to configure this IP camera with a name, description, and
unique IP address (if not obtained from DHCP). To change these options, see
the
“Basic Setup Window” section on page 3-5.
Note A configuration file that you upload includes the passwords that are
configured for the administrator and for users. If you change any
passwords after saving the configuration file, be aware that
uploading the file overwrites the new passwords with the saved ones.